- Quick Actions
- Step 1. Adding a New BOPF Action
- Step 2. Implementing the Action
- Step 3. Testing the Action in the BOPF Test Shell
- Step 4. Enabling Actions for OData Consumption
- Step 5. Running the Resulting SAP Fiori App
接上一篇 ABAP CDS - Developing New Transactional Apps using CDS part 1 我们创建一个基本 CRUD 功能的 Business Object 和 Fiori App. 本篇将对此功能进行增强, 增加更多的 Quick Actions 功能.
Quick Actions
Quick actions are used for performing an action on each individual record without the need for the end user to switch to edit mode.
Action implementation and action control requires business logic that is implemented on the basis of the BOPF API. Therefore, quick actions are implemented as standard BOPF actions that are assigned to the related business object node. At runtime, a (quick) action can modify a node instance of the assigned business object or node instance of other associated business objects.
Actions for CDS-Based BOPF Business Objects
Step 1. Adding a New BOPF Action
假设我们的需求是在商品被购买并付款后对其订单状态进行修改成 PAID, 那么我们打算创建一个 Action 是 SET_TO_PAID 去改变订单状态.
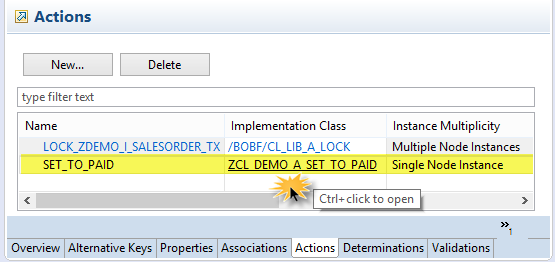
- 在 ADT 中打开我们的 BOPF Business Objects, 进入到 ROOT node 界面, 打开 Actions 页签.
- 点击 New 按钮打开 New Action 对话框
- 填入下图信息, 注意选择 Single Node Instance
- 完成并激活对应的 Class

结果是 BOPF framework 会分配此 Action 给 business object node, 并创建一个实现了 BOPF action interface /BOBF/IF_FRW_ACTION 的 action class.
Step 2. Implementing the Action
BOPF 框架只能给我们生成外壳, 真正的业务逻辑需要我们自己去写 ABAP 代码去实现, 所以我们要实现 action class.
修改 METHOD /bobf/if_frw_action~execute 代码如下:
" Typed with node's combined table type
DATA(lt_sales_order) = VALUE ztdemo_i_salesorder_tx( ).

" READING BO data ----------------------------------------------

" Retrieve the data of the requested node instance
io_read->retrieve(
  EXPORTING
  iv_node         = is_ctx-node_key
  it_key          = it_key
  IMPORTING
  et_data         = lt_sales_order
).

" WRITING BO data ---------------------------------------------

LOOP AT lt_sales_order ASSIGNING FIELD-SYMBOL(<s_sales_order>).

  " Set the attribue billing_status to new value
  <s_sales_order>-billingstatus = 'P'.  " PAID

  " Set the attribue overall_status to new value
  IF <s_sales_order>-overallstatus = 'N' OR <s_sales_order>-overallstatus = ' '.
    <s_sales_order>-overallstatus  = 'P'.  " PAID
  ENDIF.

  " Update the changed data (billig_status) of the node instance
  io_modify->update(
    EXPORTING
    iv_node               = is_ctx-node_key
    iv_key                = <s_sales_order>-key
    iv_root_key           = <s_sales_order>-root_key
    is_data               = REF #( <s_sales_order>-node_data )
    it_changed_fields     = VALUE #(
      ( zif_demo_i_salesorder_tx_c=>sc_node_attribute-zdemo_i_salesorder_tx-billingstatus )
      ( zif_demo_i_salesorder_tx_c=>sc_node_attribute-zdemo_i_salesorder_tx-overallstatus )
    )
    ).
ENDLOOP.
一般 execute 方法中的业务逻辑步骤如下
- 创建一个 combined structure’s component 变量, 这里的类型结构为
ztdemo_i_salesorder_tx, 它是我们的 Business Object 的数据结构, 通常会包含组合 key 的结构/bobf/s_frw_key_incl, 里面有:key本节点的唯一键,parent_key父节点的唯一键,root_key根节点的唯一键. Business Object 的数据结构还有一个属性node_data是实际的数据的结构, 我们这里是zsdemo_i_salesorder_tx_d. - 使用 BOPF API
io_read->retrieve读取输入的 key 对应的业务数据. - 循环并更改每一行业务数据, 并使用 BOPF API
io_modify->update更新业务对象.
Step 3. Testing the Action in the BOPF Test Shell
BOPF test environment (BOBT) 不仅可以测试 CRUD 操作, 还可以执行自定义的 Action, 来检验是否符合预期.
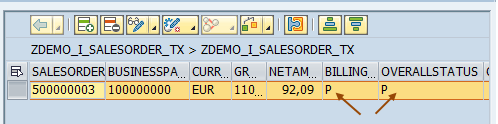
在 ADT 打开 BOPF Test Environment, 查询或新增一条记录, 选中并点击 SET_TO_PAID in Execute Action

可以看到 BillingStatus 和 OverallStatus 字段的变化
Step 4. Enabling Actions for OData Consumption
You can use the following UI annotation to expose actions to the consumer
Step 4.1 Adding Annotations for Quick Action in the Consumption View
为我们的 Consumption View ZDEMO_C_SalesOrder_TX 的主键 key Document.SalesOrder 添加注解 @UI.lineItem #FOR_ACTION, dataAction 指定为 BOPF:SET_TO_PAID
    @UI.lineItem.position: 10
    @UI.lineItem:
      [
        { type: #FOR_ACTION, position: 1, dataAction: 'BOPF:SET_TO_PAID', label: 'Set to Paid' }
      ]
key Document.SalesOrder,
激活后, OData Service 的 Metadata 信息里便增加了一个 Property
<Property Name="Set_to_paid_ac" Type="Edm.Boolean" sap:label="Dyn. Action Control" sap:creatable="false" sap:updatable="false" sap:sortable="false" sap:filterable="false"/>
和 Function Import
<FunctionImport Name="ZDEMO_C_SalesOrder_TXSet_to_paid" ReturnType="ZDEMO_C_SALESORDER_TX_CDS.ZDEMO_C_SalesOrder_TXType" EntitySet="ZDEMO_C_SalesOrder_TX" m:HttpMethod="POST" sap:action-for="ZDEMO_C_SALESORDER_TX_CDS.ZDEMO_C_SalesOrder_TXType" sap:applicable-path="Set_to_paid_ac">
  <Parameter Name="SalesOrder" Type="Edm.String" Mode="In" MaxLength="10"/>
</FunctionImport>
并且在 OData Annotations UI.LineItem 里多一个
<Record Type="UI.DataFieldForAction">
  <PropertyValue Property="Label" String="Set to Paid"/>
  <PropertyValue Property="Action" String="ZDEMO_C_SALESORDER_TX_CDS.ZDEMO_C_SALESORDER_TX_CDS_Entities/ZDEMO_C_SalesOrder_TXSet_to_paid"/>
  <PropertyValue Property="InvocationGrouping" EnumMember="UI.OperationGroupingType/Isolated"/>
</Record>
Step 4.2 Configuring Action Parameters for OData Consumption
要想能在 Fiori App 中调用此 Action, 还需要一些配置. 打开 BO editor, 转到 SET_TO_PAID action 界面 CTRL + Click. 编辑信息如下
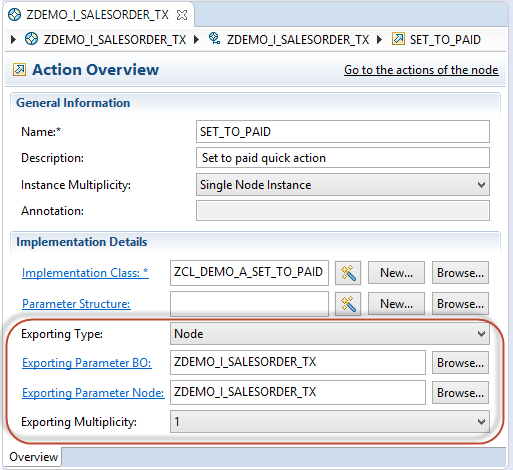
保存激活.
Step 5. Running the Resulting SAP Fiori App
重新打开 Fiori List Report App 后便可以看见多出来的一个 Quick Action 按钮 Set to Paid
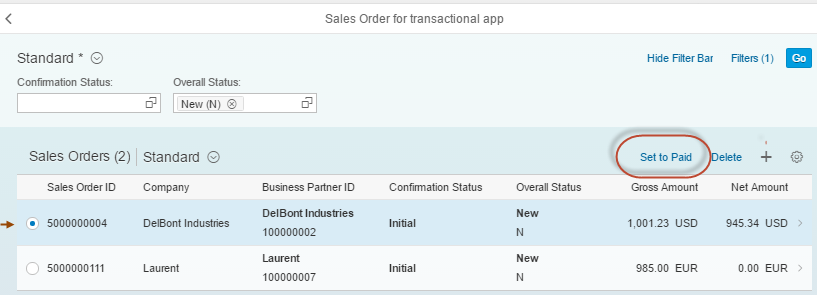
选择数据并点击按钮便会对此数据进行修改.
Comments