- Step 1. Open Web IDE Full-Stack
- Step 2. Create MTA Project
- Step 3. Binding to Remote Git Repository
- Step 4. Create HDI Module
- Step 5. Create CDS Table
- Step 6. Upload Data
- Step 7. Create Node.js Module
- Step 8. Commit Code
- Next Steps
本系列文章我们将介绍如何在 SAP Cloud Foundry Platform 上进行 HANA XSA 模式的程序开发。本篇的项目代码可下载自 gitlab.com/i.tiven.wang/sap-cf-xsa-demo .
环境:
- SAP Cloud Platform Trial
- Cloud Foundry Trial
- Neo Trial
SAP Help:
Step 1. Open Web IDE Full-Stack
Neo Trial -> Services -> SAP Web IDE Full-Stack -> Enabled -> Go to Service
Step 2. Create MTA Project
File -> New -> Project from Template -> New Multi-Target Application
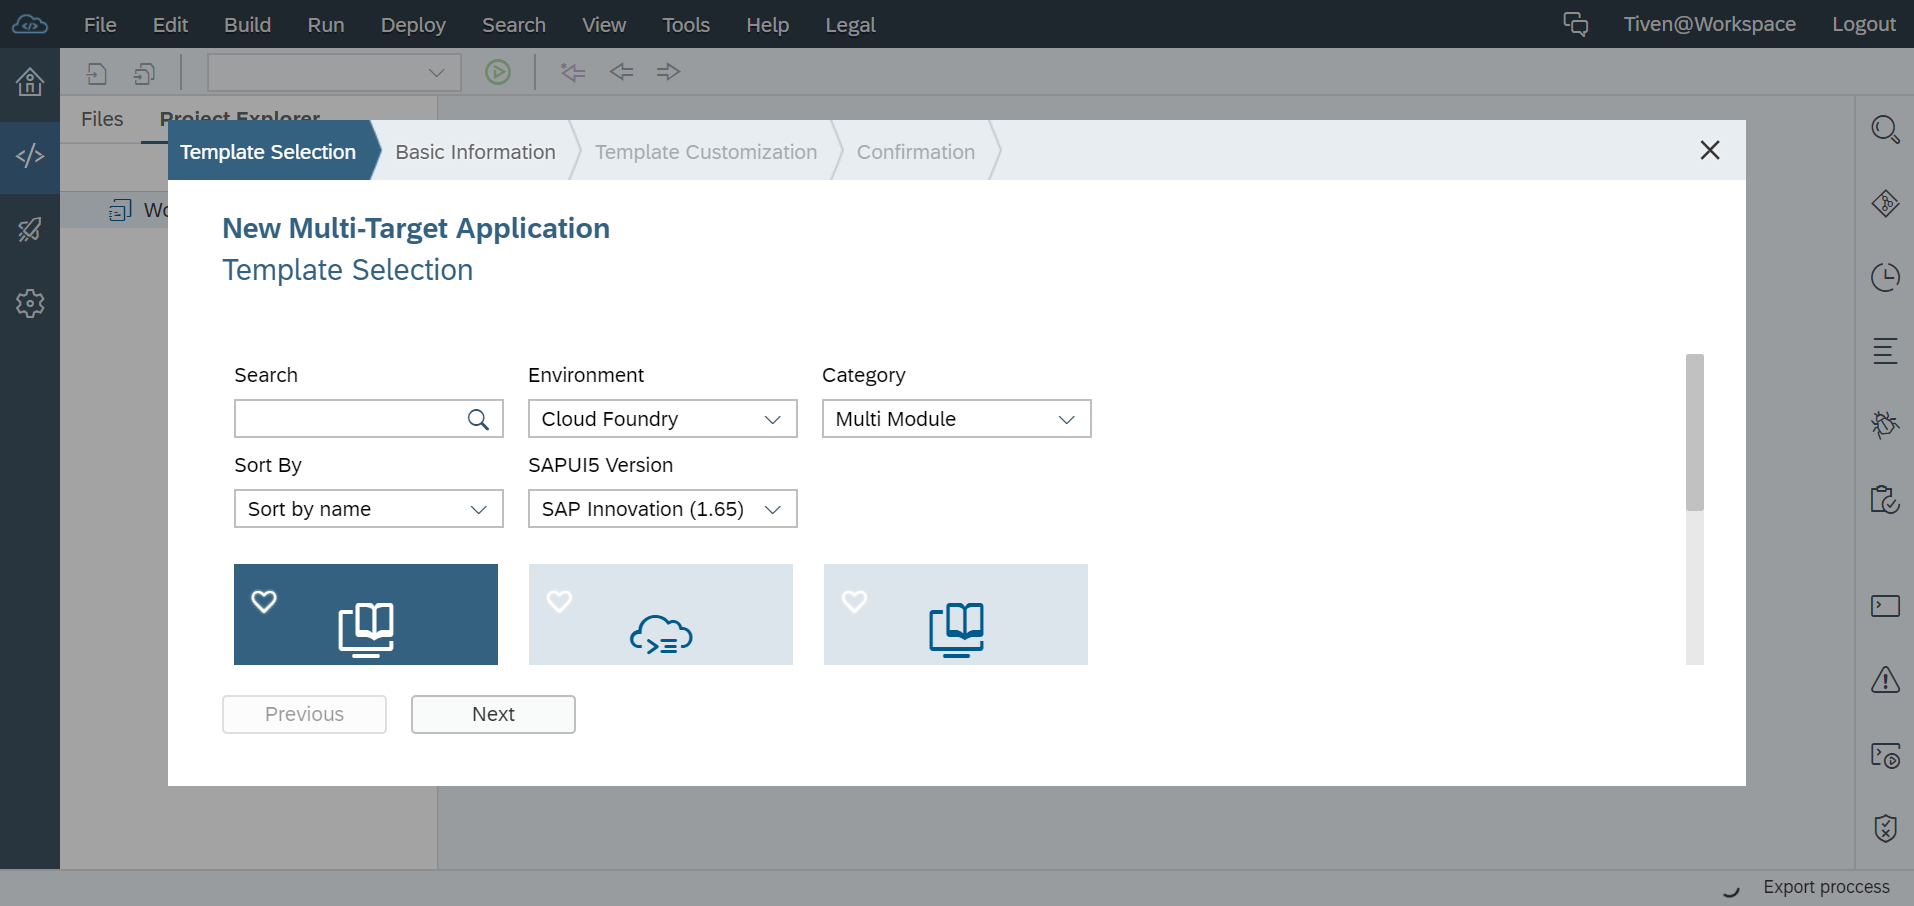
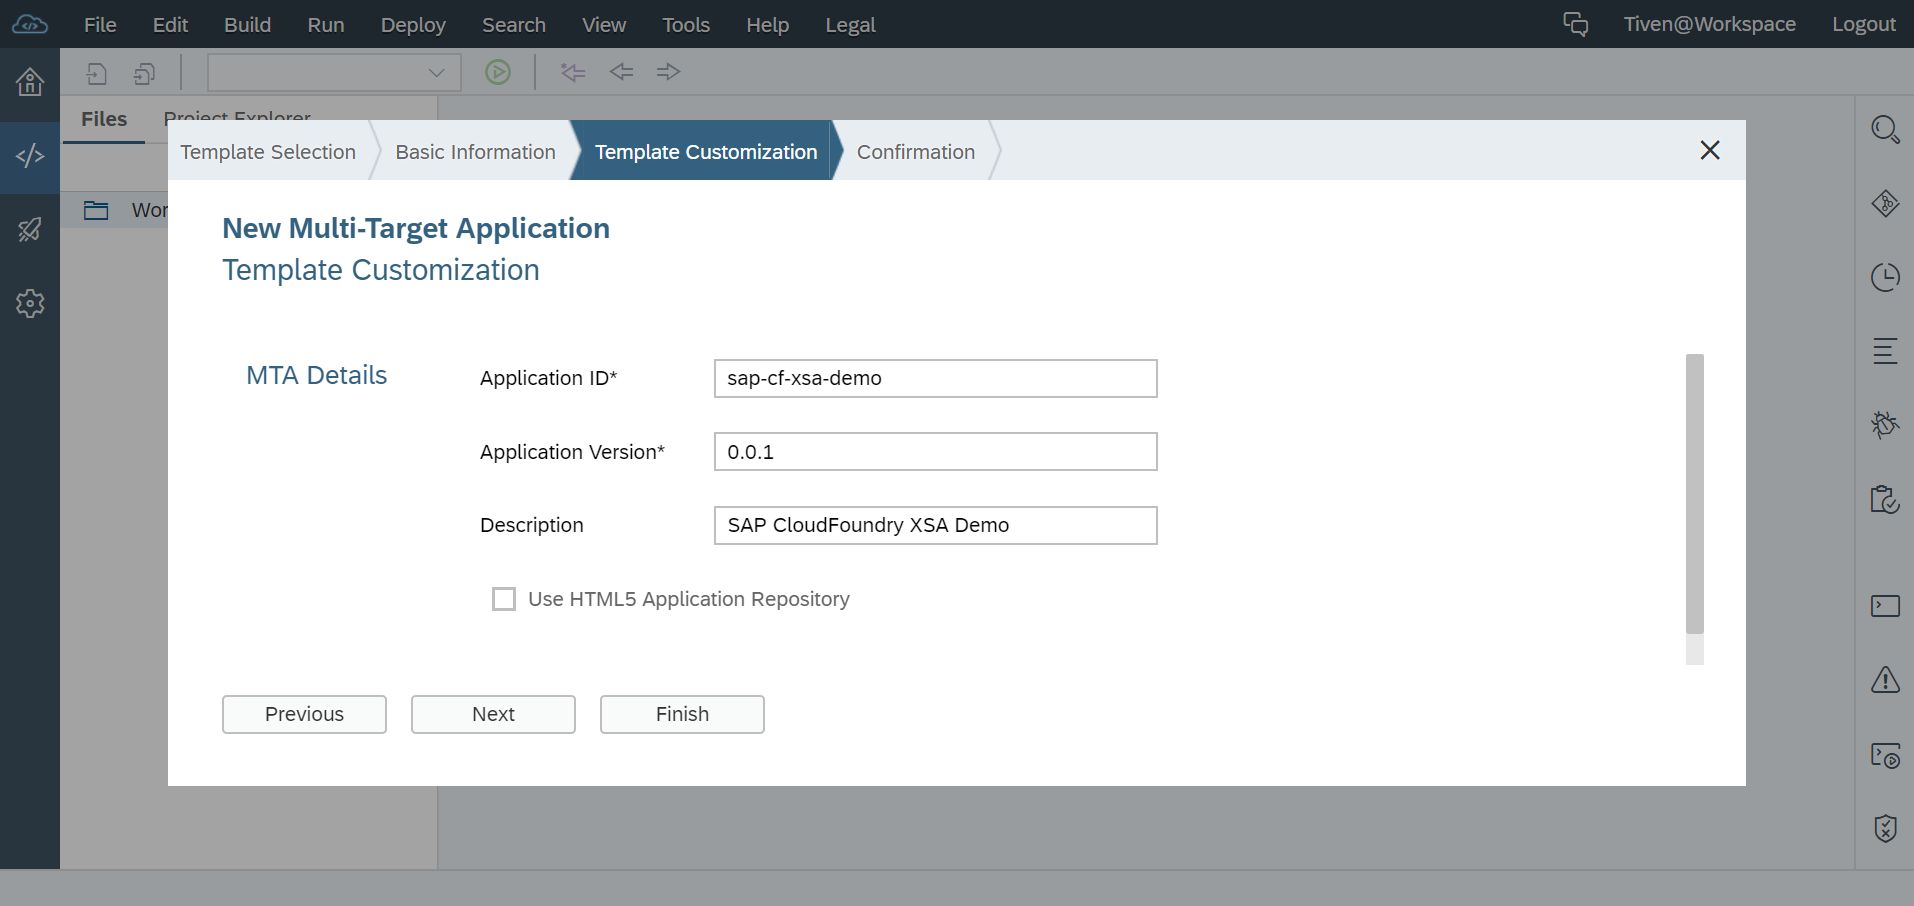
设置你的 Application name and id 例如我的是 sap-cf-xsa-demo
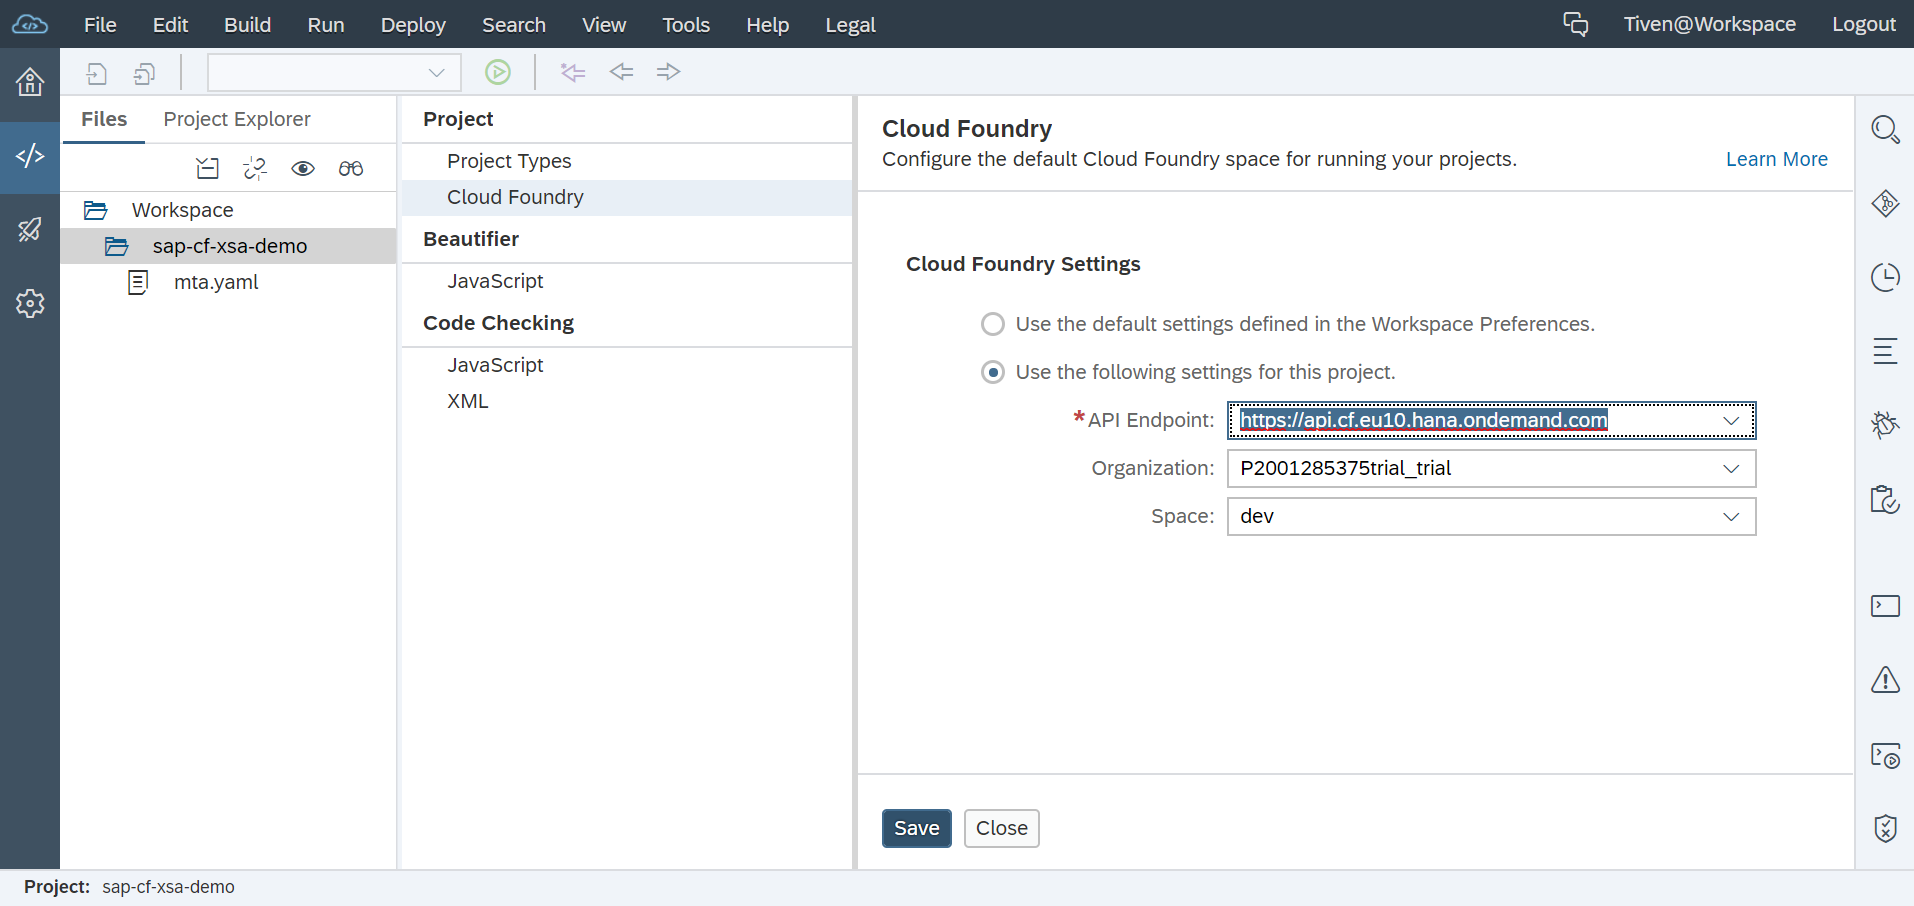
为此项目配置你的 Cloud Foundry Space,在 Project Settings 里
Step 3. Binding to Remote Git Repository
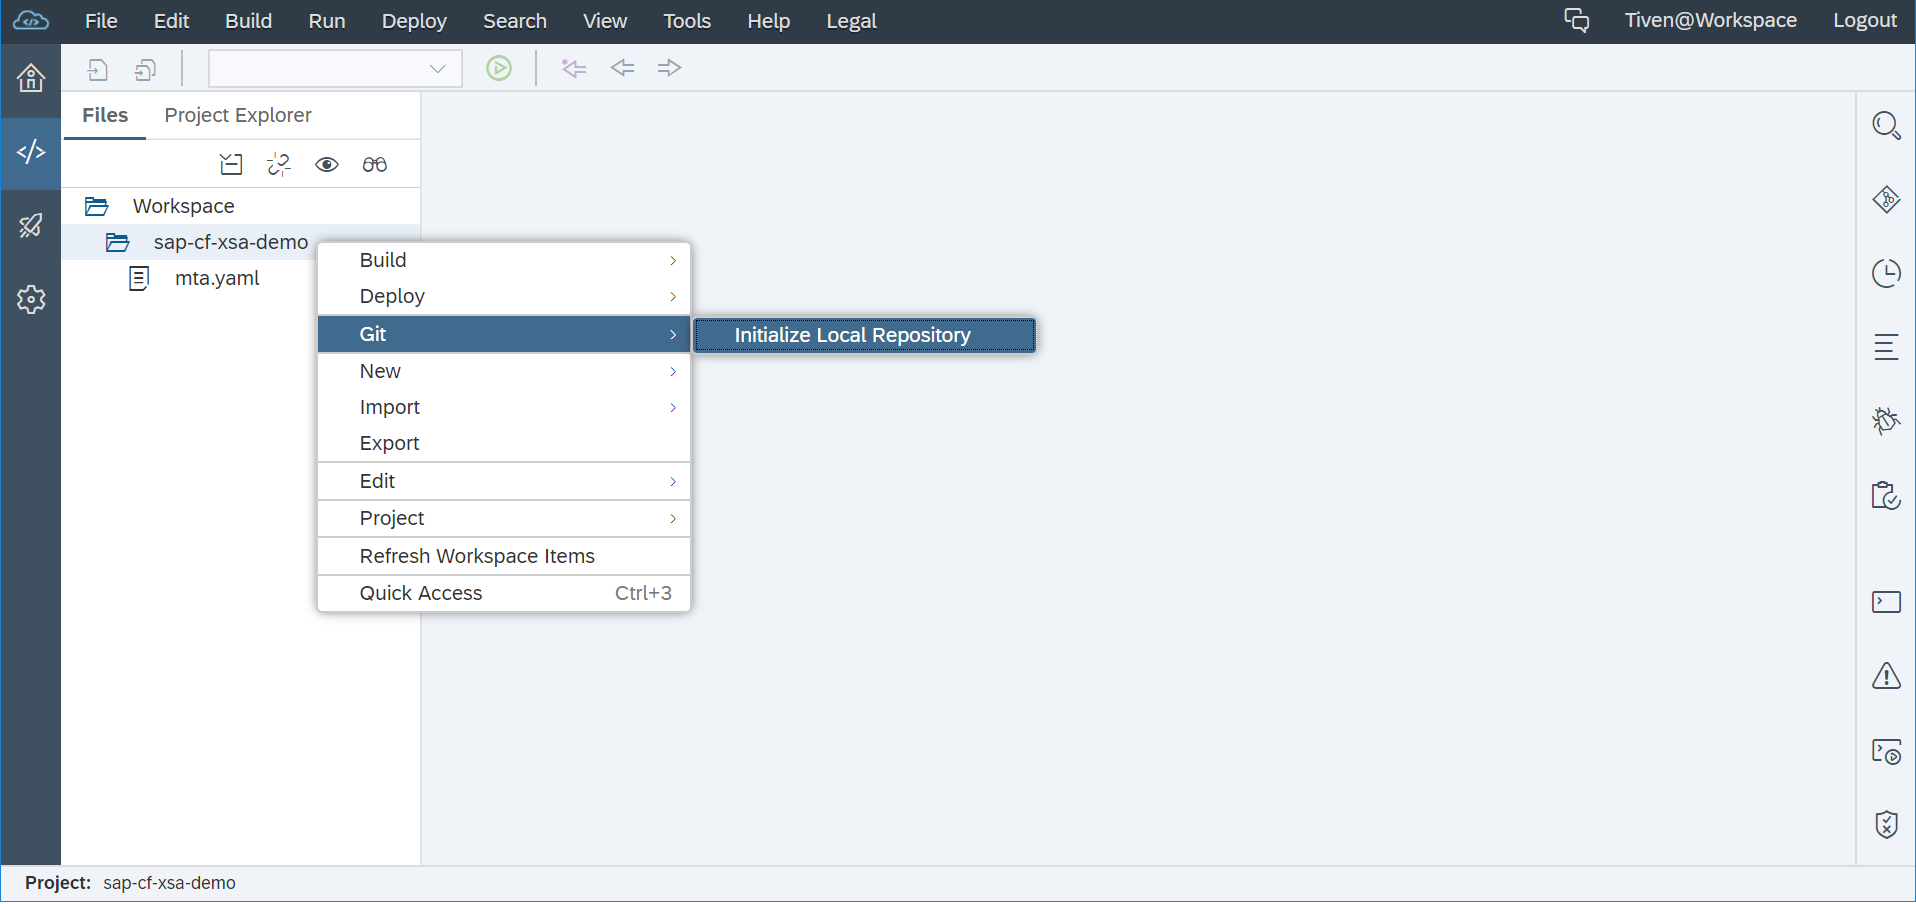
为项目初始化 Local 的 git repository
Set Remote
首先需要在公共的 Git Repository 网站(如 GitLab)上创建相应的项目
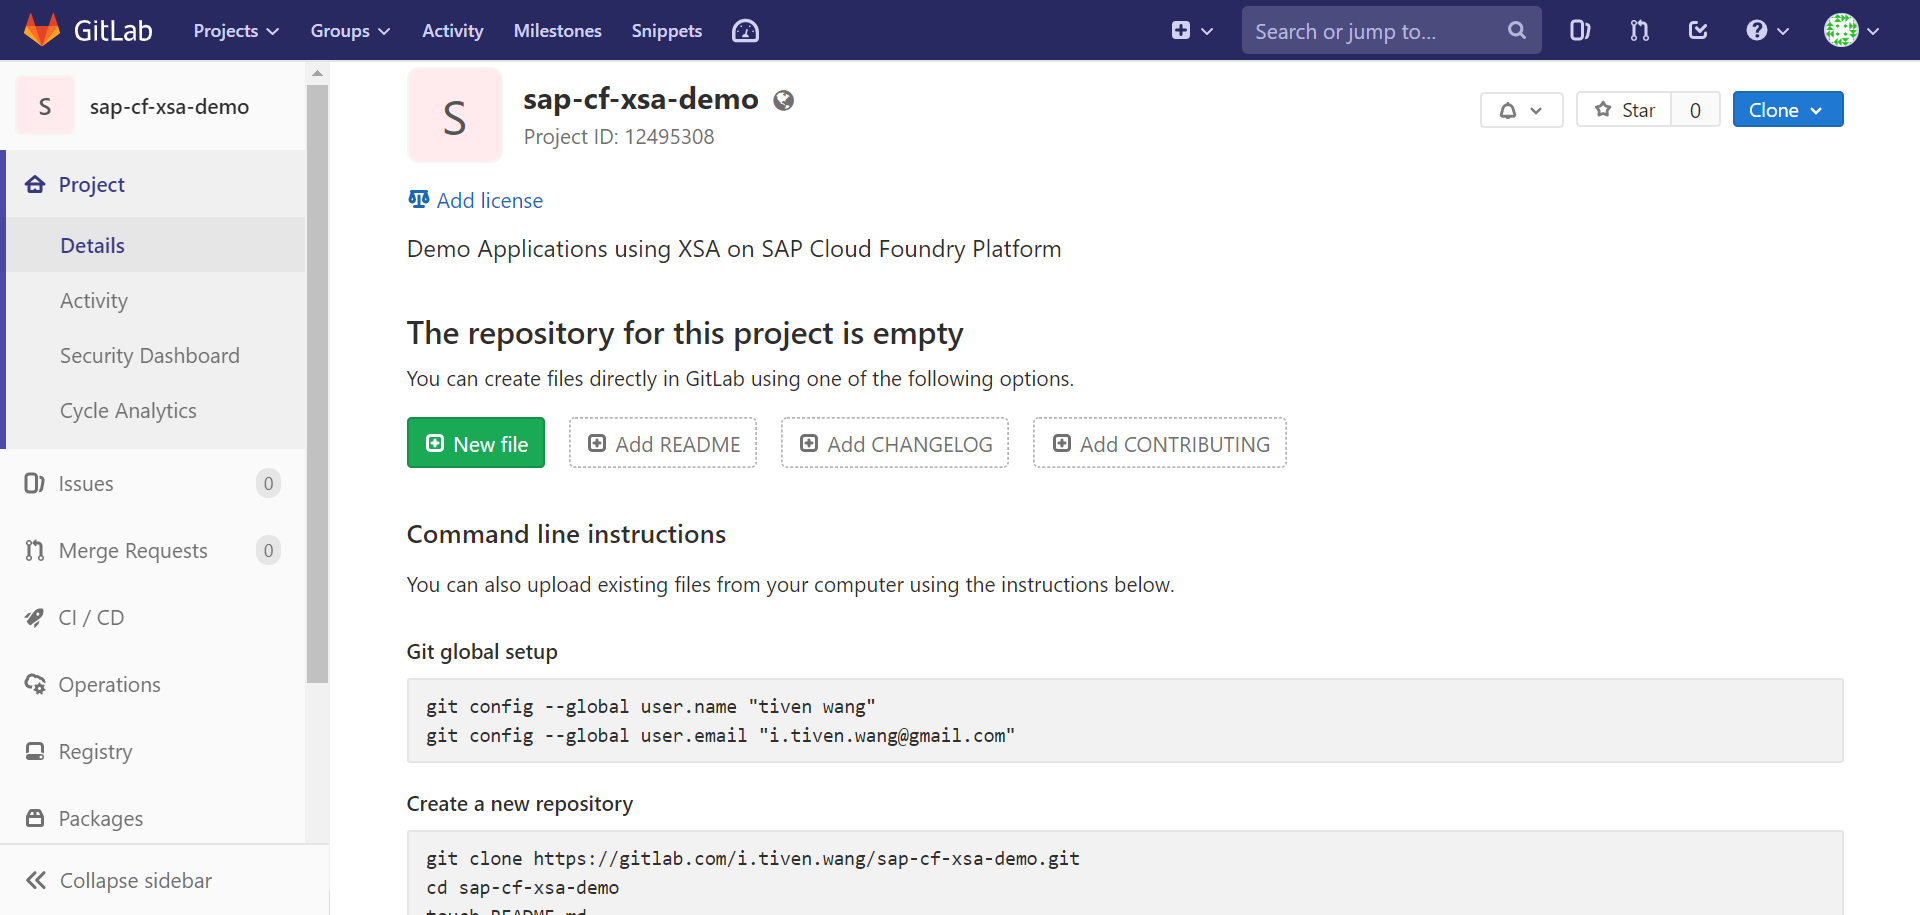
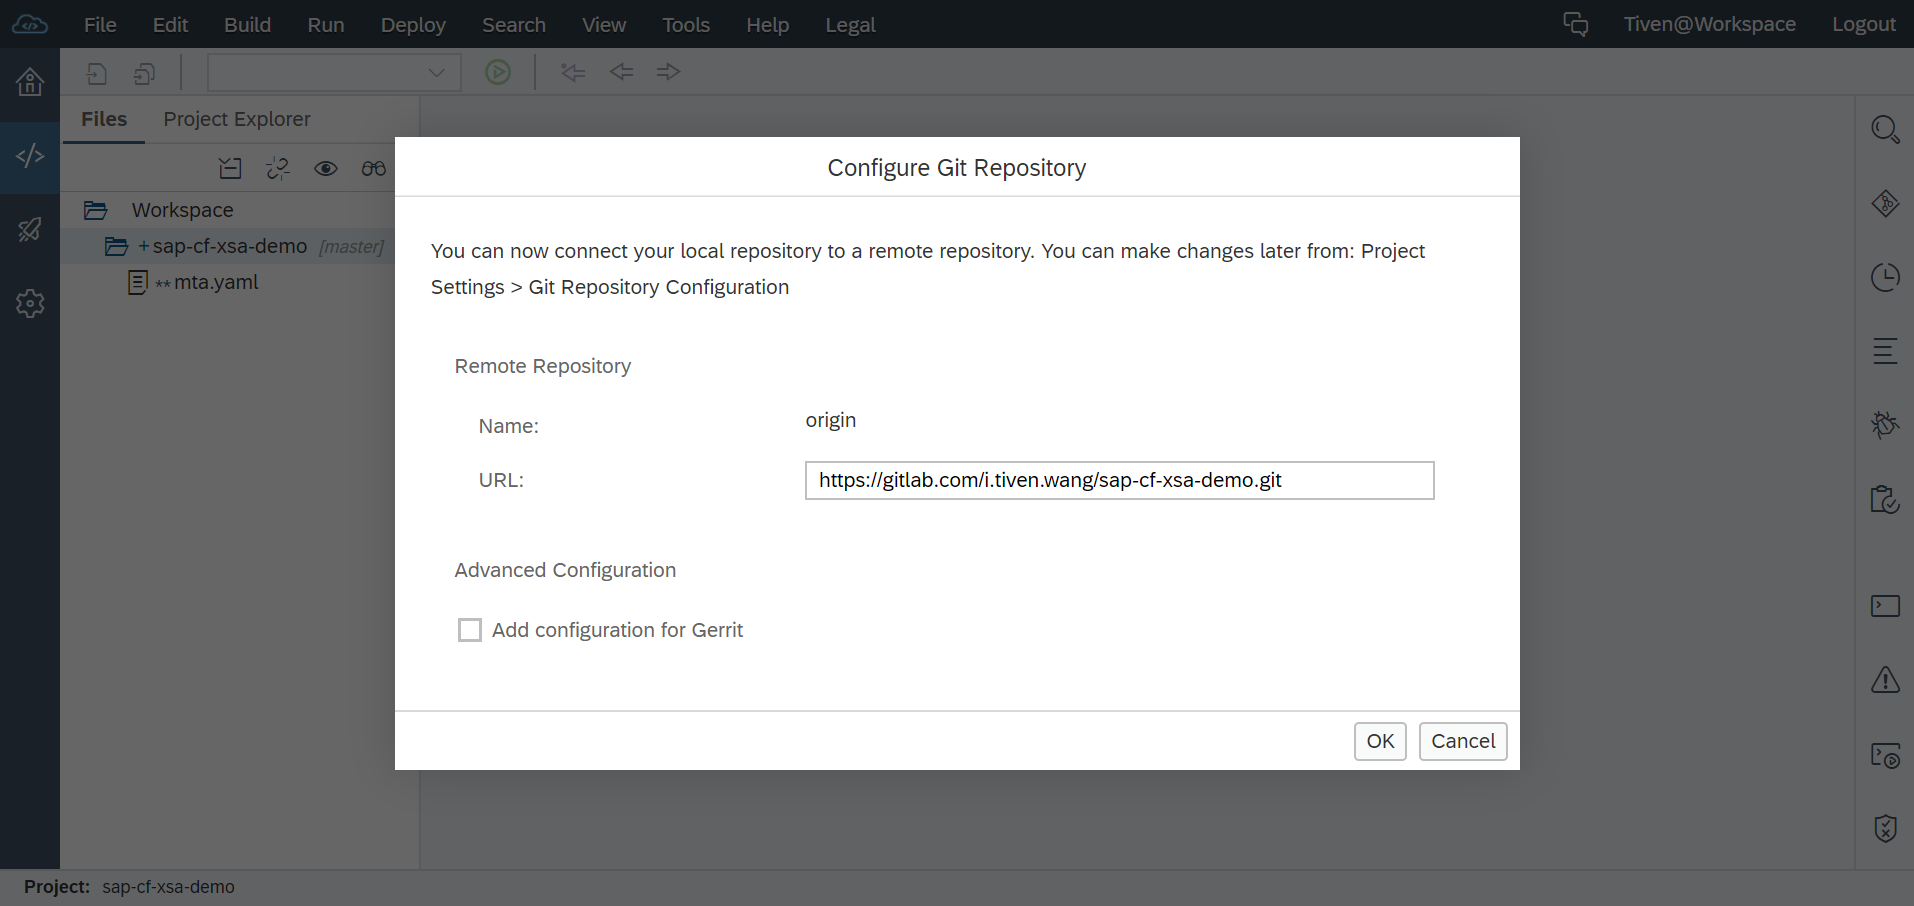
然后把 Repository url 配置给 Web IDE 里的项目
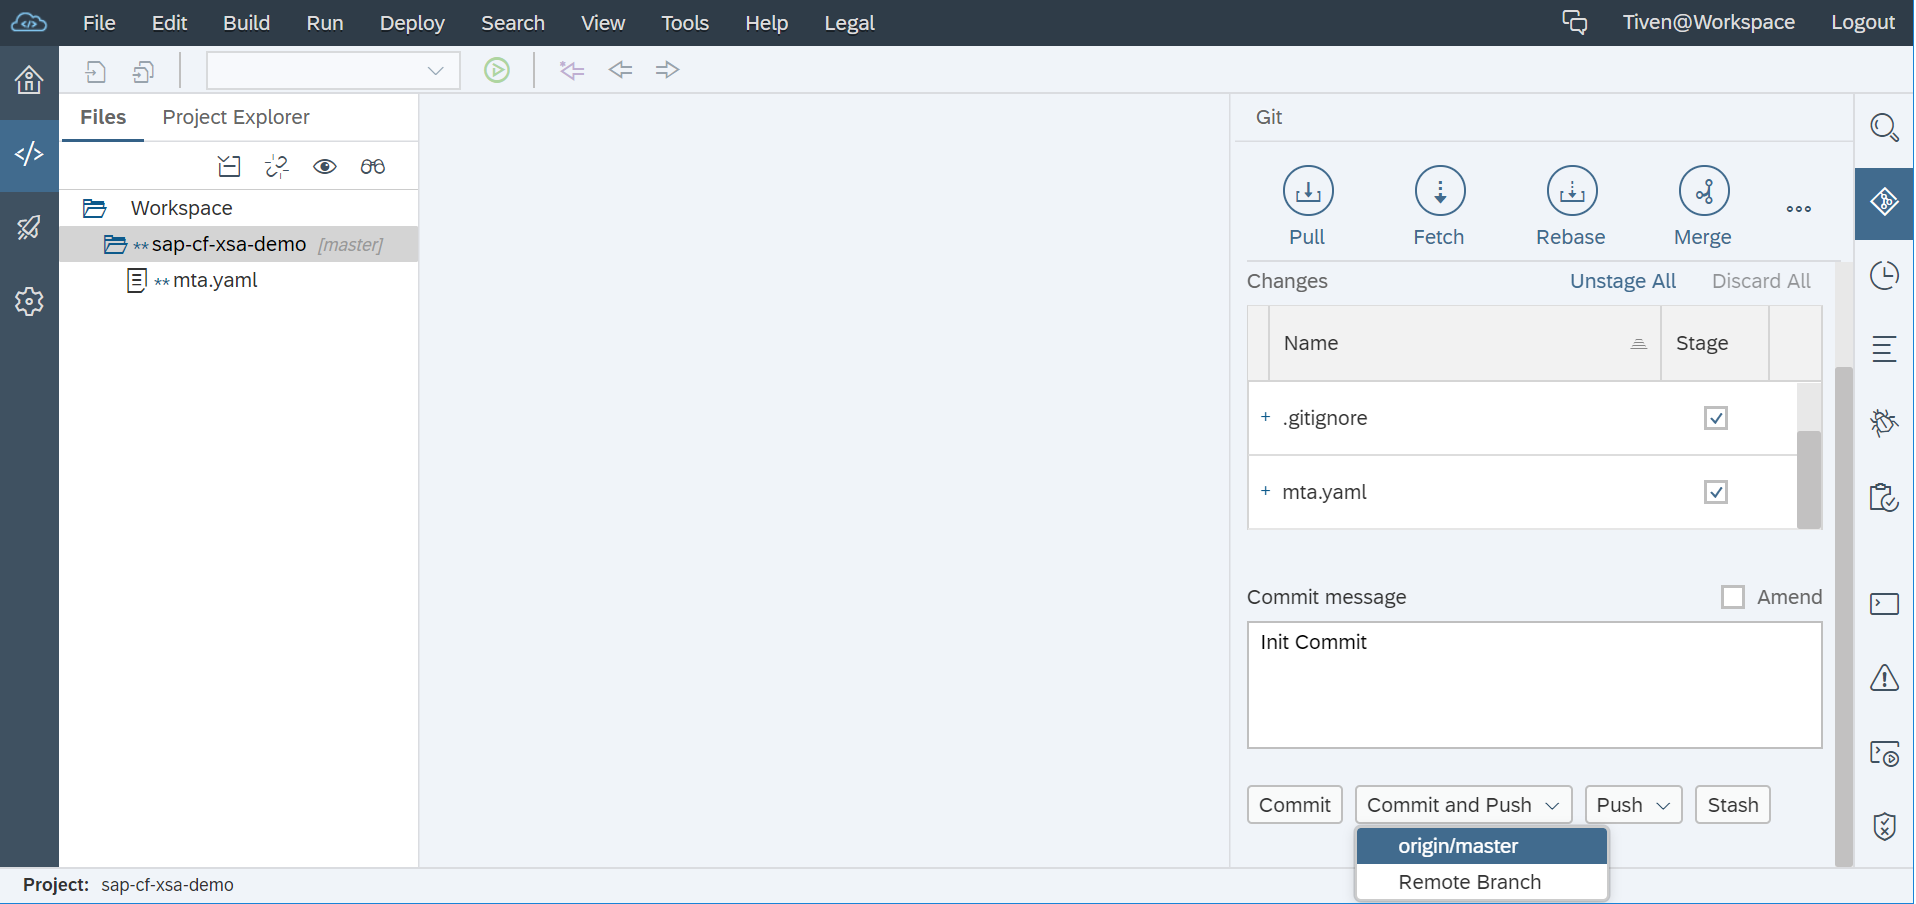
Commit
首次提交代码
Step 4. Create HDI Module
The goal of HDI is to manage database artifacts from design time objects but in a way that allows multiple copies/versions of the same core objects to be used on the same HANA database at the same time.
HDI introduces the concept of the container as an abstraction of the Schema. The container in turn dynamically generates the Schema, a container-specific Database User who owns all objects and a password for that database user. XS Advanced based services then only need access to the container and never need to know the actual Schema, technical user, or password. All of that information is stored within the container definition.
New HANA Database Module
on Project -> New -> SAP HANA Database Module
记得 Namespace 和 Schema Name 字段要清空,因为有了 HDI 就不再需要命名空间和 Schema Name 了, HDI 是最好的命名空间; 注意 HANA Database 版本使用默认,不要更改。
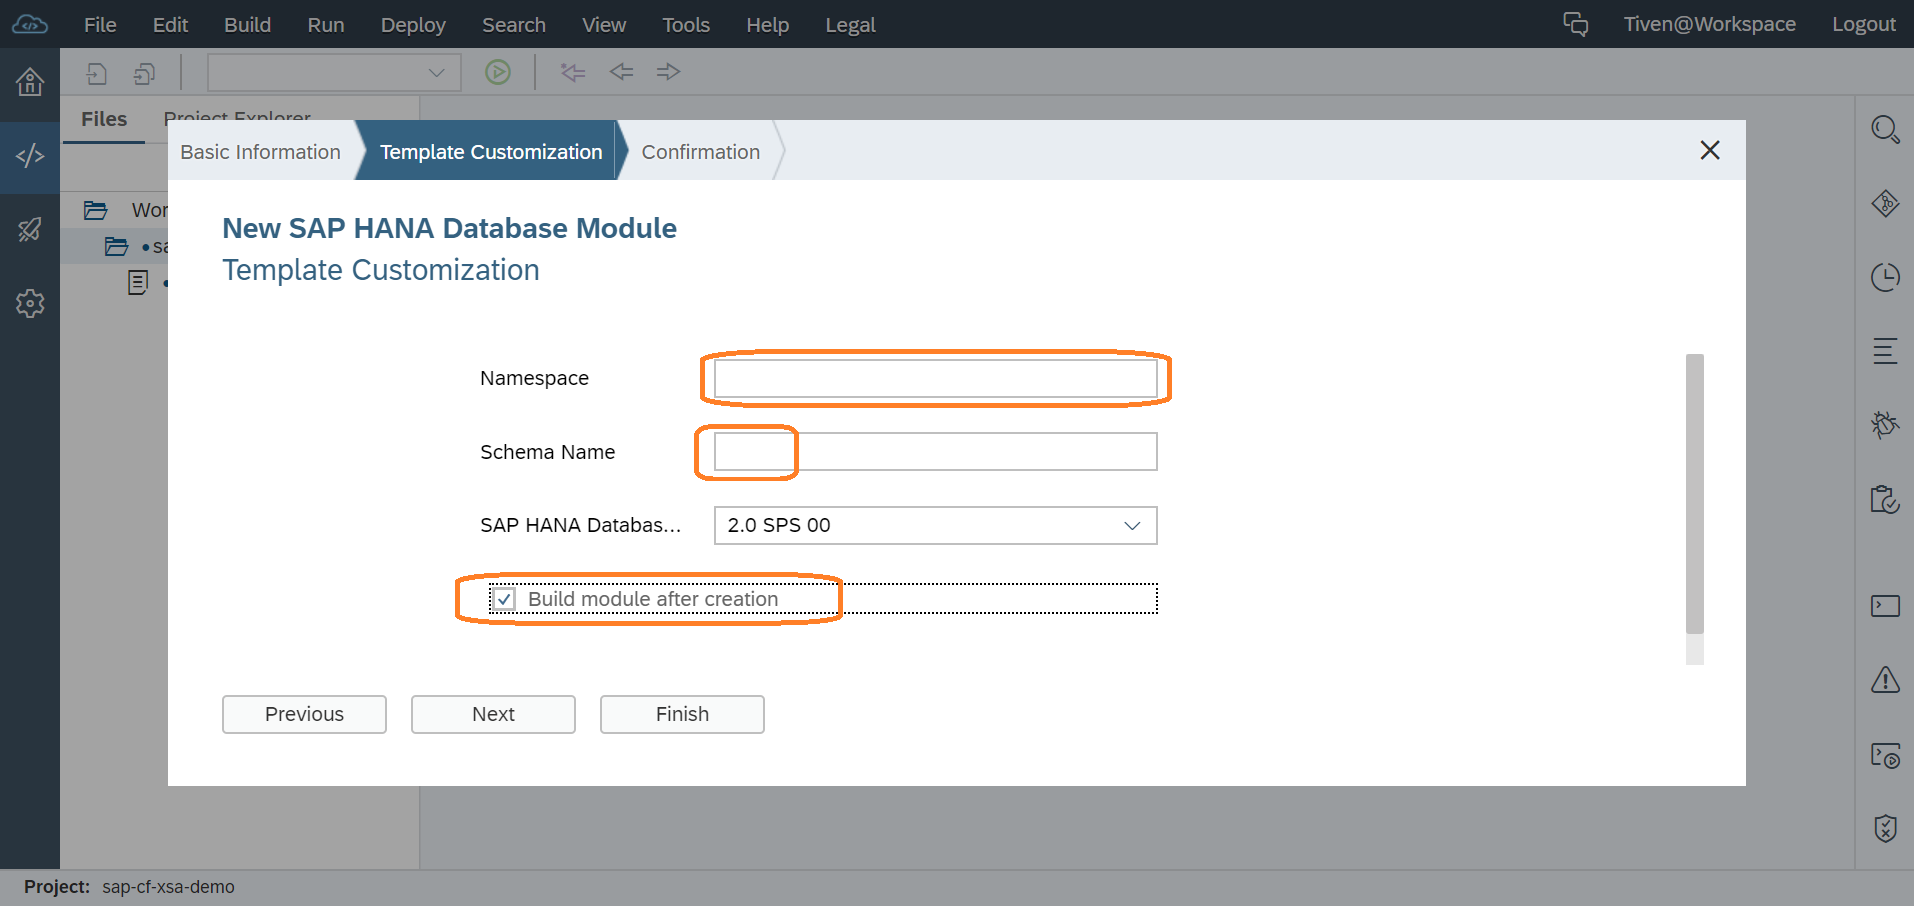
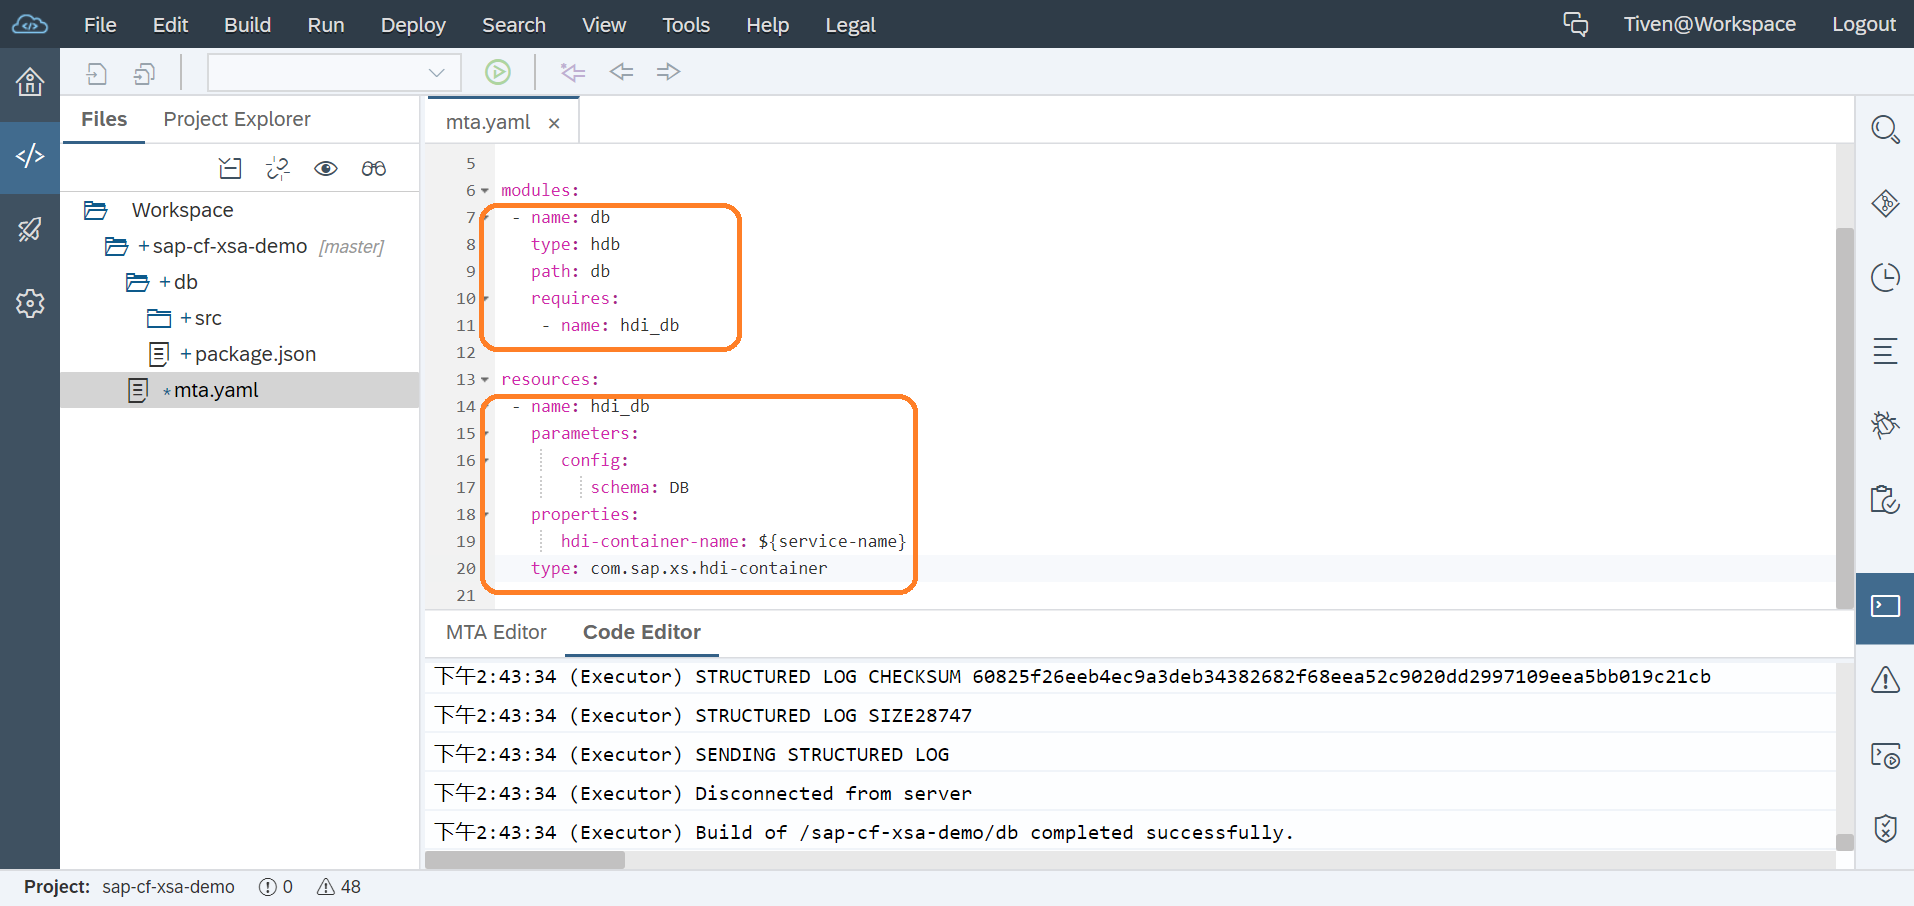
执行完后你将在你的 Cloud Foundry 平台 Space 的 Service Instances 里看到多了一个 hanatrial 服务的实例(实际上是用来测试用的),这就是你的 HDI。另外一边在配置文件 mta.yaml 将多了 DB 相关的一个 module 和一个 resource
Step 5. Create CDS Table
The db/src folder is where your actual database development objects belong.
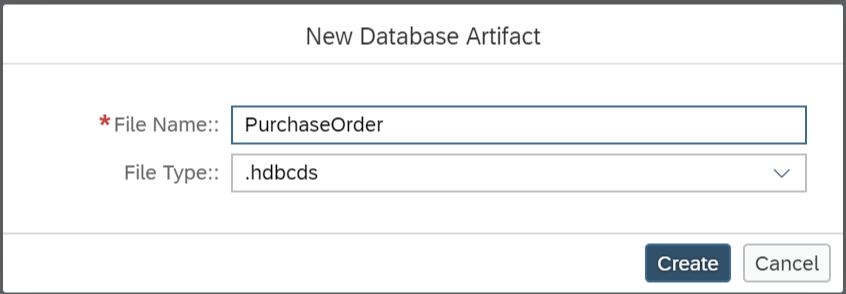
在 src 下面创建一个新的文件夹 data,然后在 data 里 New -> Database Artifact 输入名称 PurchaseOrder 选择文件类型 .hdbcds
并为文件填入内容
context PurchaseOrder {
    type BusinessKey : String(10);
    type SDate : LocalDate;
    type CurrencyT : String(5);
    type AmountT : Decimal(15, 2);
    type QuantityT : Decimal(13, 3);
    type UnitT : String(3);
    type StatusT : String(1);
    type HistoryT {
        @Comment : 'Created By'
        CREATEDBY : BusinessKey;
        @Comment : 'Created Date'
        CREATEDAT : SDate;
        @Comment : 'Changed By'
        CHANGEDBY : BusinessKey;
        @Comment : 'Change Date'
        CHANGEDAT : SDate;
    };

    @Comment : 'Purchase Order Header'
    entity Header {
            @Comment : 'Purchase Order ID'
        key PURCHASEORDERID : Integer generated by default as identity(start with 200000000 increment by 1 no minvalue maxvalue 2999999999 no cache no cycle);
            ITEMS           : association[1, 0..*] to Item on Header.PURCHASEORDERID = PURCHASEORDERID;
            HISTORY         : HistoryT;
            @Comment : 'Notes'
            NOTEID          : BusinessKey null;
            @Comment : 'Supplier'
            PARTNER         : BusinessKey;
            @Comment : 'Currency'
            CURRENCY        : CurrencyT;
            @Comment : 'Gross Amount'
            GROSSAMOUNT     : AmountT;
            @Comment : 'Net Amount'
            NETAMOUNT       : AmountT;
            @Comment : 'Tax Amount'
            TAXAMOUNT       : AmountT;
            @Comment : 'Lifecycle Status'
            LIFECYCLESTATUS : StatusT;
            @Comment : 'Approval Status'
            APPROVALSTATUS  : StatusT;
            @Comment : 'Confirmation Status'
            CONFIRMSTATUS   : StatusT;
            @Comment : 'Ordering Status'
            ORDERINGSTATUS  : StatusT;
            @Comment : 'Invoicing Status'
            INVOICINGSTATUS : StatusT;
    }
    technical configuration {
        column store;
    };

    @Comment : 'Purchase Order Item'
    entity Item {
        key POHeader     : association[*, 1..1] to Header { PURCHASEORDERID };
            @Comment : 'Product ID'
        key PRODUCT      : BusinessKey;
            @Comment : 'Notes'
            NOTEID       : BusinessKey null;
            @Comment : 'Currency'
            CURRENCY     : CurrencyT;
            @Comment : 'Gross Amount'
            GROSSAMOUNT  : AmountT;
            @Comment : 'Net Amount'
            NETAMOUNT    : AmountT;
            @Comment : 'Tax Amount'
            TAXAMOUNT    : AmountT;
            @Comment : 'Quantity'
            QUANTITY     : QuantityT;
            @Comment : 'Quantity Unit'
            QUANTITYUNIT : UnitT;
            @Comment : 'Delivery Date'
            DELIVERYDATE : SDate;
    }
    technical configuration {
        column store;
        //    index PURCHASEORDER_ITEM_ID on (POHeader.PURCHASEORDERID) asc;
    };

    @Comment : 'Purchase Order Item View'
    define view ItemView as
        select from Item
        {
            POHeader.PURCHASEORDERID as "PurchaseOrderItemId",
            POHeader.PARTNER         as "PartnerId",
            PRODUCT                  as "ProductID",
            CURRENCY                 as "CurrencyCode",
            GROSSAMOUNT              as "Amount",
            NETAMOUNT                as "NetAmount",
            TAXAMOUNT                as "TaxAmount",
            QUANTITY                 as "Quantity",
            QUANTITYUNIT             as "QuantityUnit",
            DELIVERYDATE             as "DeliveryDate1"
        }
        with structured privilege check;
};
在 db 上点击 build 部署到 HANA Database。
Step 6. Upload Data
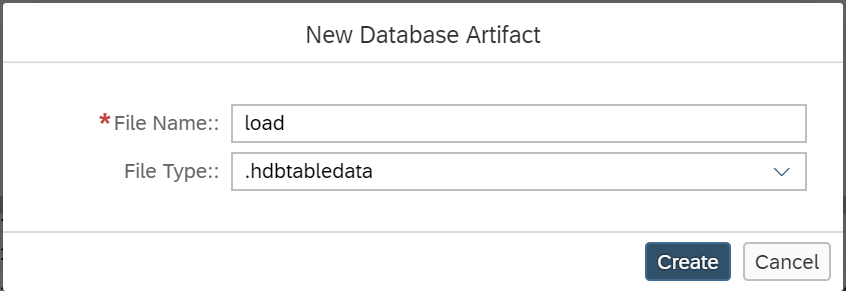
在 db/src/data 文件夹里 New -> Database Artifact 输入名称 load 选择文件类型 .hdbtabledata
填入以下内容
{
"format_version": 1,
"imports": [{
  "target_table": "PurchaseOrder.Header",
  "source_data": {
    "data_type": "CSV",
    "file_name": "header.csv",
    "has_header": false,
    "dialect": "HANA",
    "type_config": {
      "delimiter": ","
    }
  },
  "import_settings": {
    "import_columns": ["PURCHASEORDERID",
    "NOTEID",
    "PARTNER",
    "CURRENCY",
    "GROSSAMOUNT",
    "NETAMOUNT",
    "TAXAMOUNT",
    "LIFECYCLESTATUS",
    "APPROVALSTATUS",
    "CONFIRMSTATUS",
    "ORDERINGSTATUS",
    "INVOICINGSTATUS"]
  },
  "column_mappings": {
    "PURCHASEORDERID": 1,
    "NOTEID": 6,
    "PARTNER": 7,
    "CURRENCY": 8,
    "GROSSAMOUNT": 9,
    "NETAMOUNT": 10,
    "TAXAMOUNT": 11,
    "LIFECYCLESTATUS": 12,
    "APPROVALSTATUS": 13,
    "CONFIRMSTATUS": 14,
    "ORDERINGSTATUS": 15,
    "INVOICINGSTATUS": 16
  }
},
{
  "target_table": "PurchaseOrder.Item",
  "source_data": {
    "data_type": "CSV",
    "file_name": "item.csv",
    "has_header": false,
    "dialect": "HANA",
    "type_config": {
      "delimiter": ","
    }
  },
  "import_settings": {
    "import_columns": ["POHeader.PURCHASEORDERID",
    "PRODUCT",
    "NOTEID",
    "CURRENCY",
    "GROSSAMOUNT",
    "NETAMOUNT",
    "TAXAMOUNT",
    "QUANTITY",
    "QUANTITYUNIT" ]
  },
  "column_mappings": {
    "POHeader.PURCHASEORDERID": 1,
    "PRODUCT": 3,
    "NOTEID": 4,
    "CURRENCY": 5,
    "GROSSAMOUNT": 6,
    "NETAMOUNT": 7,
    "TAXAMOUNT": 8,
    "QUANTITY": 9,
    "QUANTITYUNIT": 10
  }
}]
}
再创建数据文件 header.csv 并填入以下数据
0500000000,0000000033,20120101,0000000033,20120101,9000000001,0100000000,EUR,13224.47,11113,2111.47,N,I,I,I,I
0500000001,0000000033,20120102,0000000033,20120102,9000000001,0100000002,EUR,12493.73,10498.94,1994.79,N,I,I,I,I
创建数据文件 item.csv 并填入以下数据
0500000000,0000000010,HT-1000,,EUR,1137.64,956,181.64,1,EA,20121204
0500000000,0000000020,HT-1091,,EUR,61.88,52,9.88,2,EA,20121204
0500000000,0000000030,HT-6100,,EUR,1116.22,938,178.22,2,EA,20121204
0500000000,0000000040,HT-1001,,EUR,2275.28,1912,363.28,2,EA,20121204
0500000000,0000000050,HT-1092,,EUR,92.82,78,14.82,3,EA,20121204
0500000000,0000000060,HT-6101,,EUR,1116.22,938,178.22,2,EA,20121204
0500000000,0000000070,HT-1002,,EUR,2275.28,1912,363.28,2,EA,20121204
0500000000,0000000080,HT-1090,,EUR,61.88,52,9.88,2,EA,20121204
0500000000,0000000090,HT-6102,,EUR,1674.33,1407,267.33,3,EA,20121204
0500000000,0000000100,HT-1007,,EUR,3412.92,2868,544.92,3,EA,20121204
0500000001,0000000010,HT-1100,,USD,213.96,179.8,34.16,2,EA,20121204
0500000001,0000000020,HT-2026,,USD,35.69,29.99,5.7,1,EA,20121204
0500000001,0000000030,HT-1002,,USD,3736.6,3140,596.6,2,EA,20121204
0500000001,0000000040,HT-1101,,USD,213.96,179.8,34.16,2,EA,20121204
0500000001,0000000050,HT-2027,,USD,71.38,59.98,11.4,2,EA,20121204
0500000001,0000000060,HT-1003,,USD,3736.6,3140,596.6,2,EA,20121204
0500000001,0000000070,HT-1102,,USD,320.94,269.7,51.24,3,EA,20121204
0500000001,0000000080,HT-2028,,USD,107.06,89.97,17.09,3,EA,20121204
0500000001,0000000090,HT-1004,,USD,3736.6,3140,596.6,2,EA,20121204
0500000001,0000000100,HT-1103,,USD,320.94,269.7,51.24,3,EA,20121204
再次 build db module,数据会被导入数据库表中。
由于 SAP Web IDE 是云端的,所以文件内容可能没有保存成功,导致 build 过程中出现 file is empty 类似的错误,重新保存后重新 build 就可以了。
Check in Data Explorer
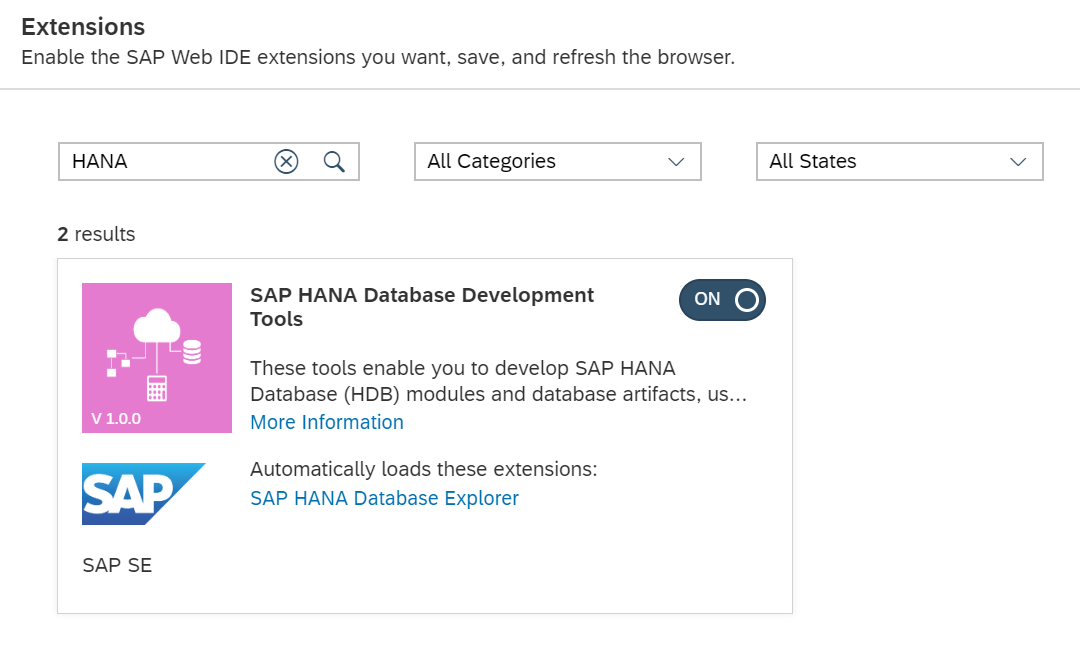
要查看 HDI 中的数据库对象和数据,首先需要为 SAP Web IDE 安装插件 SAP HANA Database Explorer 或者 SAP HANA Database Development Tools
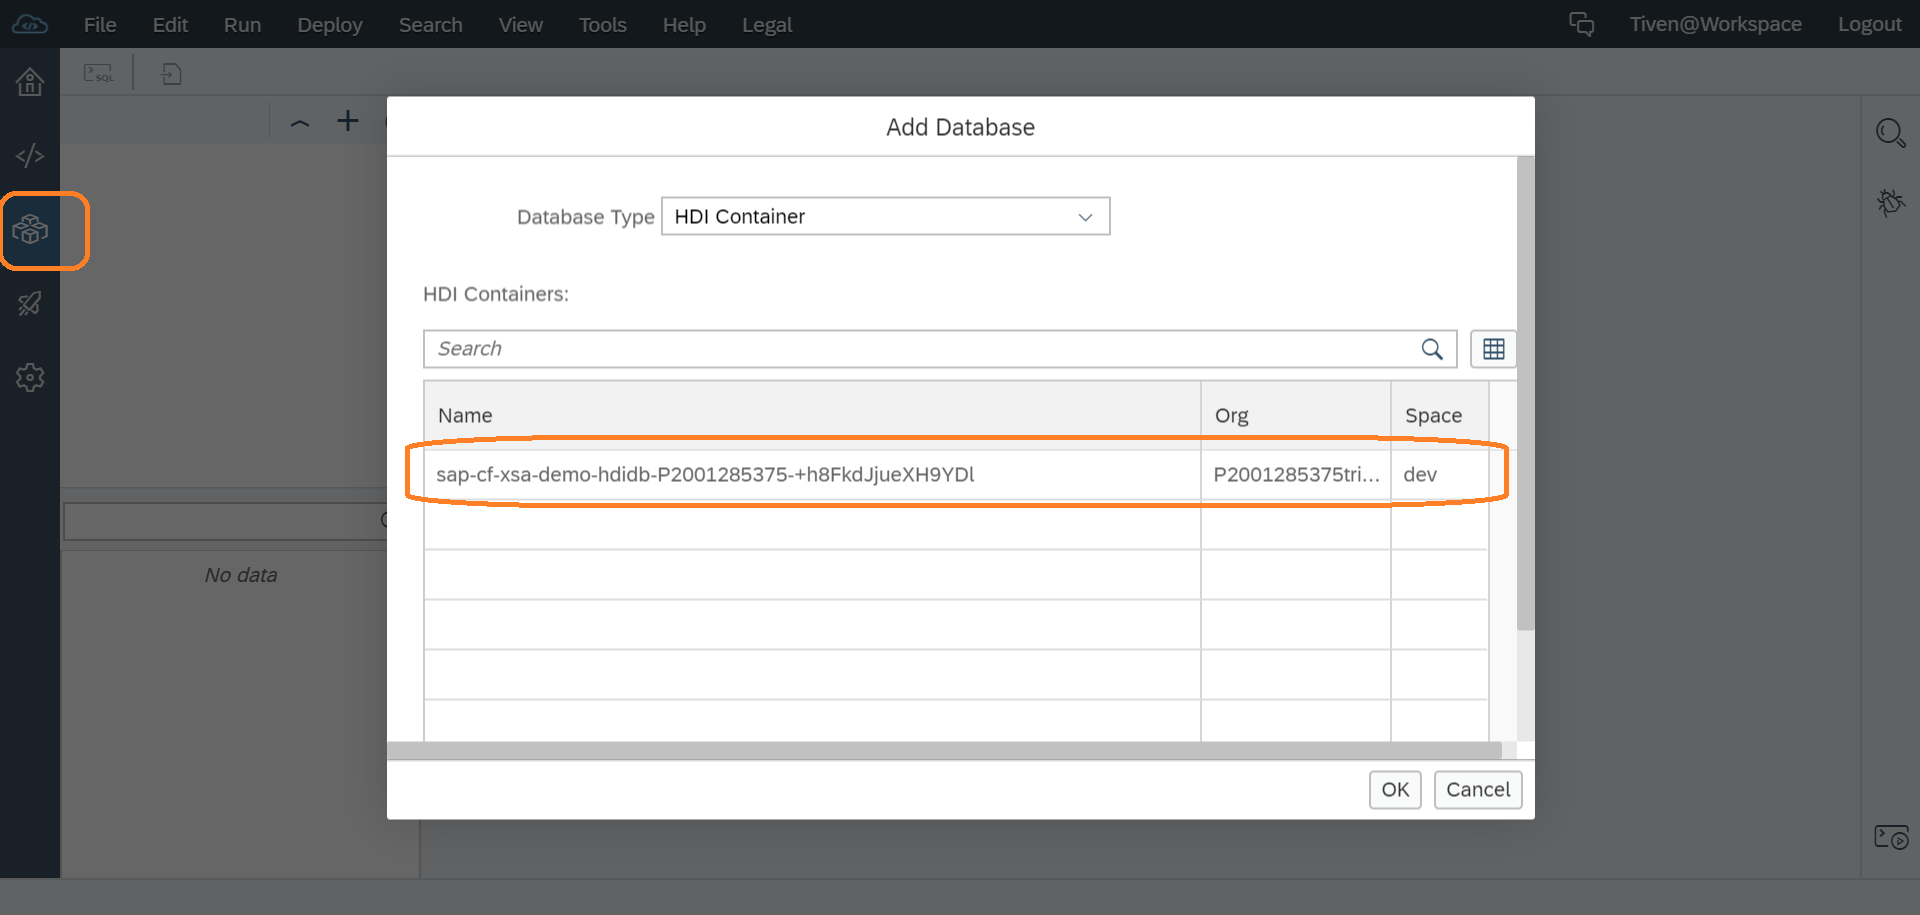
在左边栏选择 Data Explorer 然后添加一个 HDI 容器
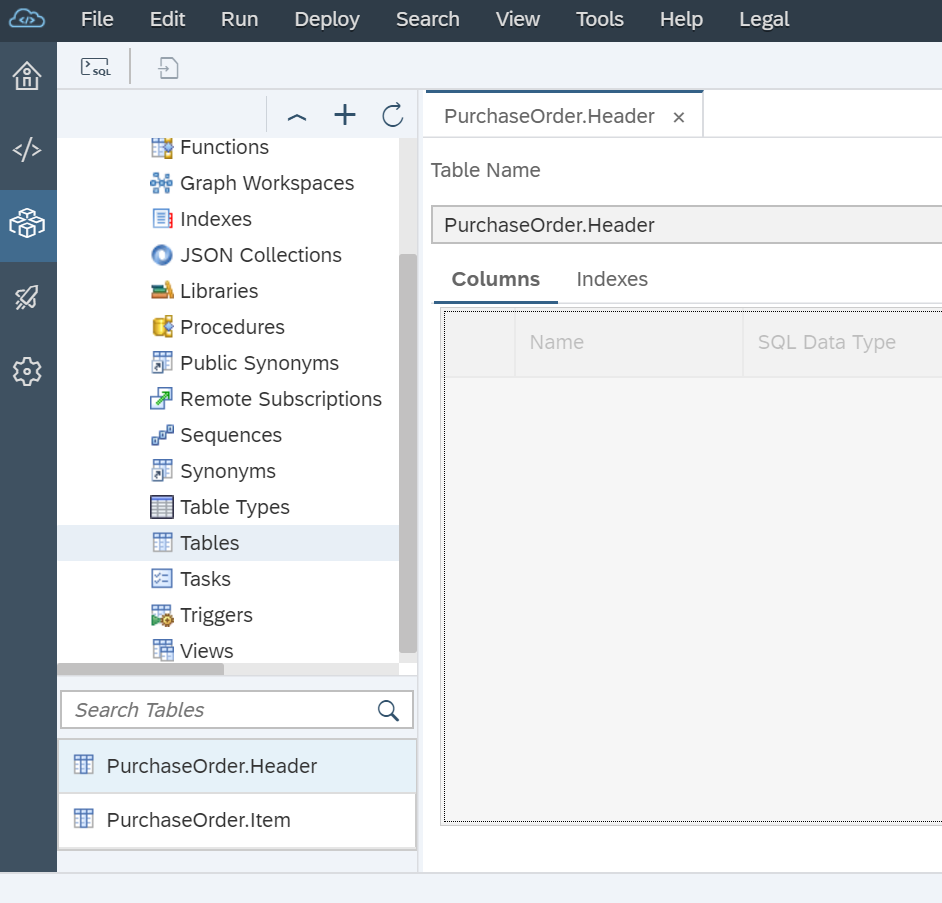
可以查看此 HDI 容器内所有的数据库对象和数据
Step 7. Create Node.js Module
Creating a Node.js Module and implementing XSJS and XSODATA
on Project -> New -> Node.js Module
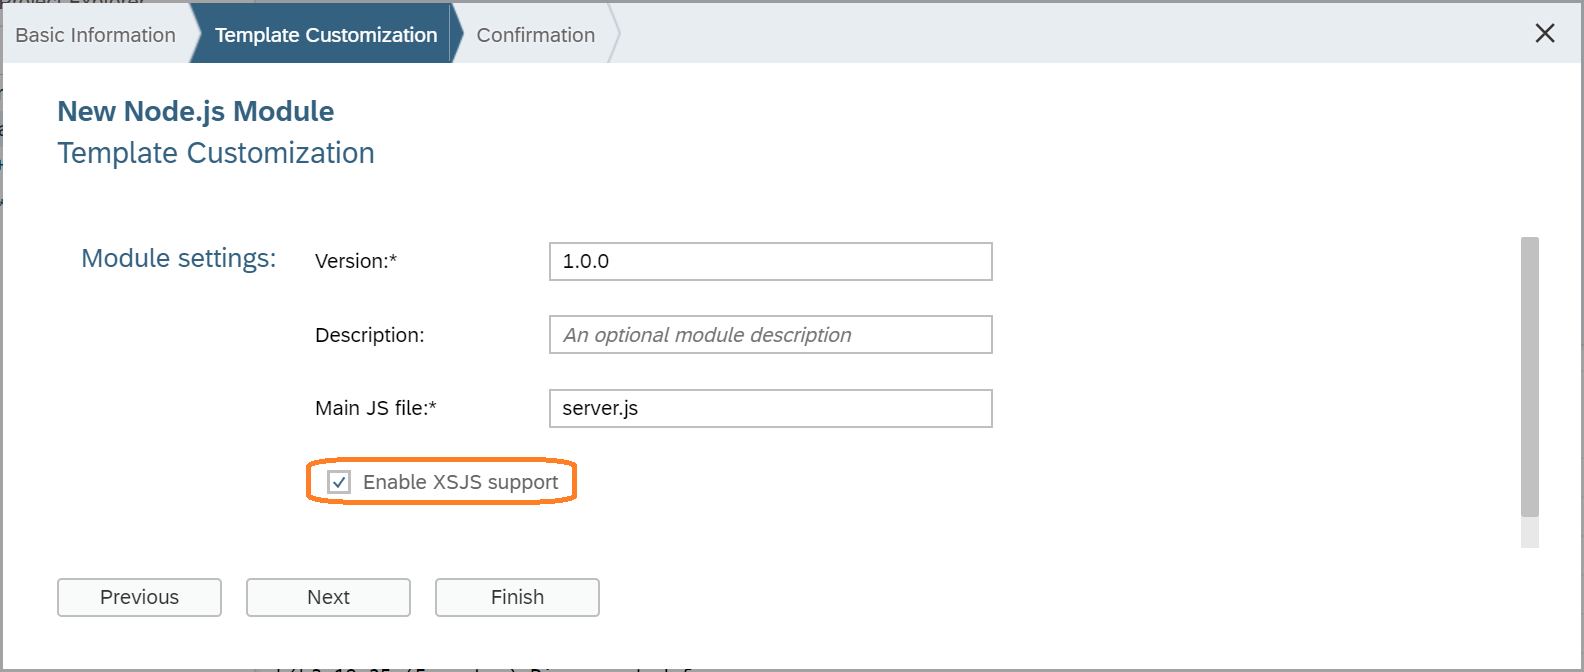
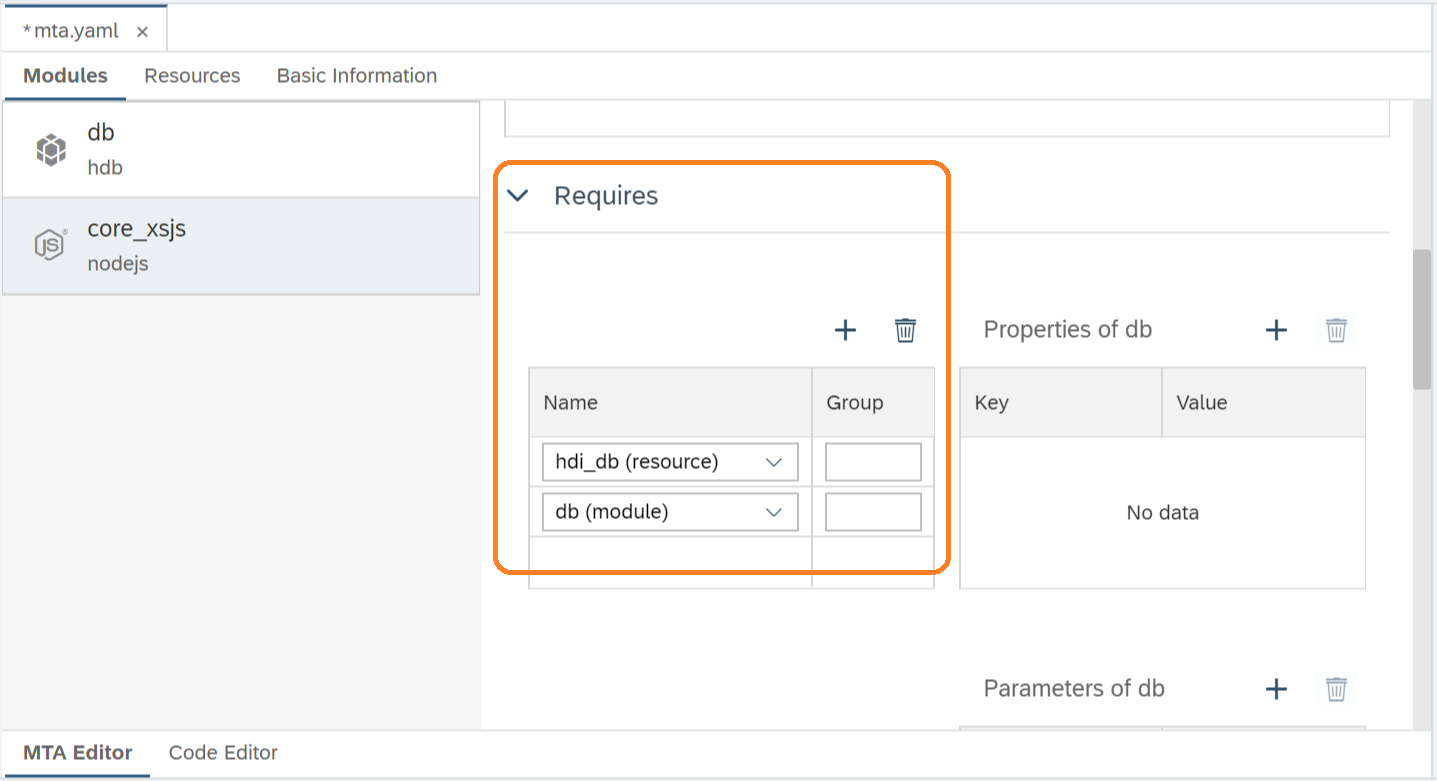
完成后你将在配置文件 mta.yaml 中看到多了一个 module core_xsjs. 因为 core_xsjs module 要访问数据库那么就需要数据库的 module 和 resource
Create an OData service
在文件夹 lib 新建文件夹 xsodata, 然后在里面创建文件 purchaseOrder.xsodata 并填入下面内容
service {
    "PurchaseOrder.Header"
        as "POHeader" navigates ("Items" as "POItem");

    "PurchaseOrder.Item"
        as "POItem";

    association "Items" principal  "POHeader"("PURCHASEORDERID")
    multiplicity "1" dependent "POItem"("POHeader.PURCHASEORDERID") multiplicity "*";
}
Create an XSJS service
在文件夹 lib 新建文件夹 xsjs, 然后在里面创建文件 hdb.xsjs 并填入下面内容
/*eslint no-console: 0, no-unused-vars: 0, dot-notation: 0*/
/*eslint-env node, es6 */
"use strict";

var conn = $.hdb.getConnection();
var query = "SELECT FROM PurchaseOrder.Item { " +
	        " POHeader.PURCHASEORDERID as \"PurchaseOrderItemId\", " +
            " PRODUCT as \"ProductID\", " +
            " GROSSAMOUNT as \"Amount\" " +
            " } ";
var rs = conn.executeQuery(query);

var body = "";
for(var item of rs){
   if(item.Amount >= 500){
	body += item.PurchaseOrderItemId + "\t" +
			item.ProductID + "\t" + item.Amount + "\n";
   }
}

$.response.setBody(body);
$.response.contentType = "application/vnd.ms-excel; charset=utf-16le";
$.response.headers.set("Content-Disposition",
		"attachment; filename=Excel.xls");
$.response.status = $.net.http.OK;
再在 xsjs 中创建另外一个文件 csrf.xsjs, 内容为空,它只是当需要做 update/insert/delete 操作时用来请求 XSRF Token 的。
Run as Node.js Application
on core_xsjs -> Run -> Run as Node.js Application
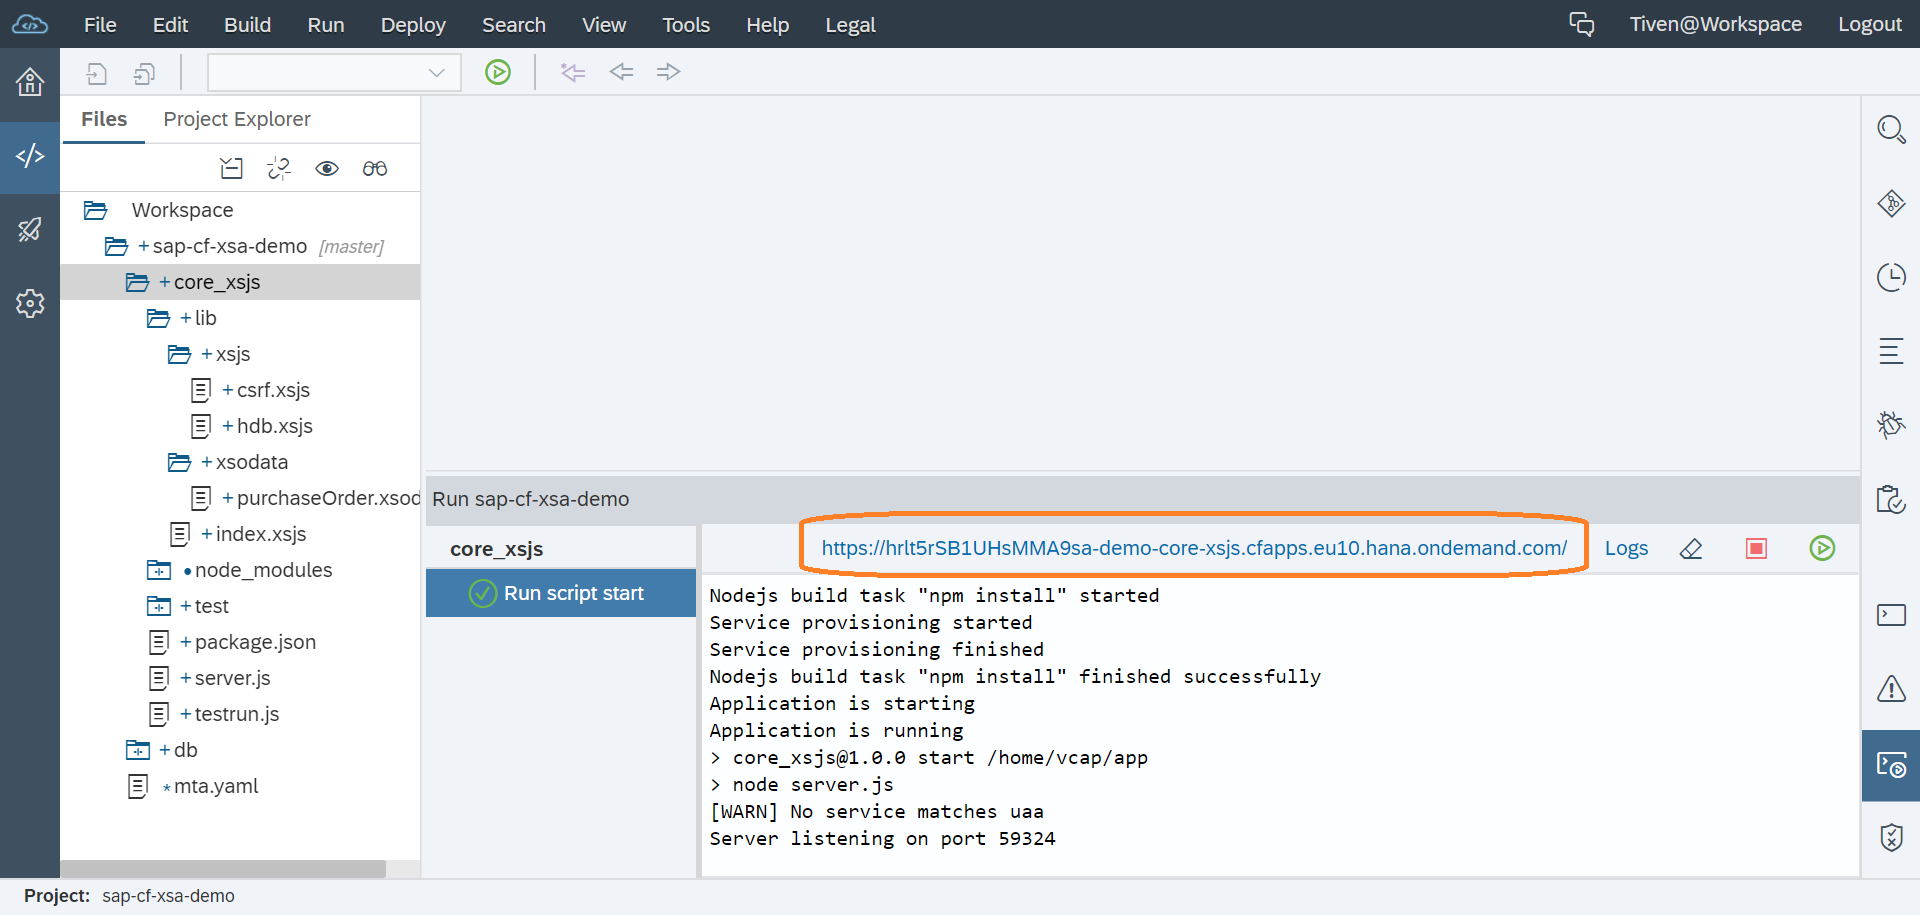
成功运行后你将会看到 Node.js Application 的 URL 出现。打开此链接将会转到 /index.xsjs 出现 Hello world 的页面, 修改链接 path 为 /xsjs/hdb.xsjs 将会下载一个数据表的 Excel 文件,链接 path 改为 /xsodata/purchaseOrder.xsodata?$format=json 将会看到此 OData service 的 metadata 数据, 用 /xsodata/purchaseOrder.xsodata/POHeader?$format=json 便可访问具体数据了。
Step 8. Commit Code
最后别忘了提交代码,养成良好的习惯。
Comments