Tiven Wang
Wang Tiven June 08, 2018
425 favorite favorites
bookmark bookmark
share share

首先来看一下我们要创建的 Kubernetes cluster 整体架构

Image: Kubernetes cluster using Kubeadm

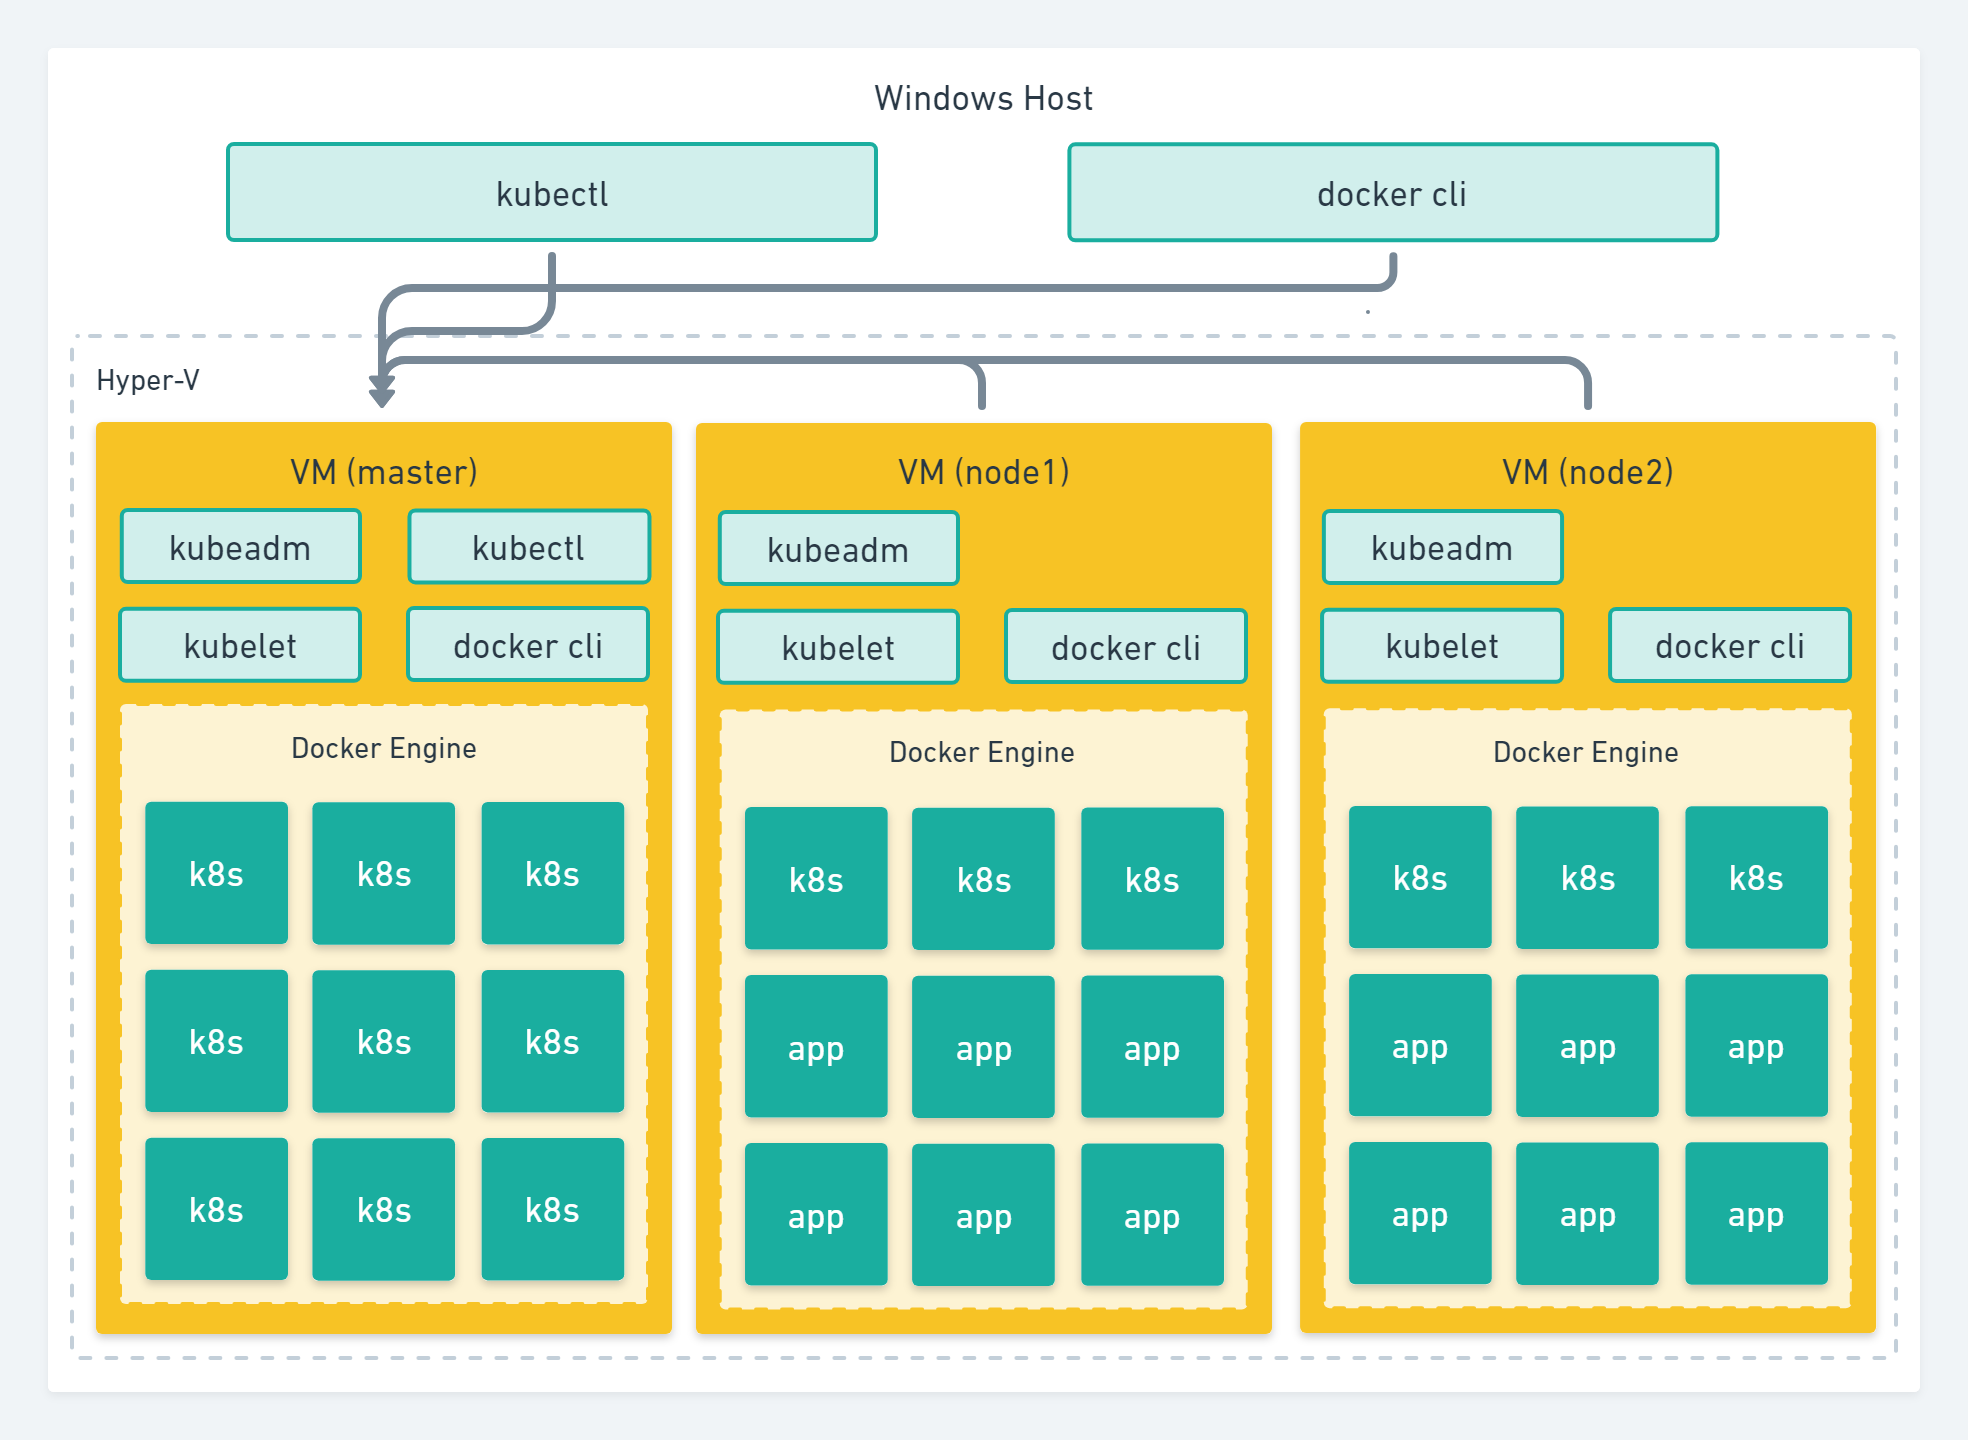
首先我们会创建安装和部署 master 虚拟机,然后再创建安装 node 虚拟机并加入到 master 主机代表的 Kubernetes cluster。 本篇我们只演示一个 node 虚拟机,内存富裕的小伙伴可以多创建几个 node 虚拟机加入 Kubernetes cluster。

VM as Kube Node

现在就创建一个虚拟机作为 Kubernetes Cluster 新的 Node 主机。Kubernetes 节点主机支持不同的 Linux 系统,只要可以安装相关软件。为了大众化我们选择 Ubuntu server 系统,下载 Ubuntu server 镜像 https://www.ubuntu.com/download/server

然后在 Hyper-V Manager 中创建一个虚拟机并安装此 Ubuntu server 镜像。

我本来想用 docker-machine 命令工具创建的虚拟机作为 Kubernetes Cluster 节点主机的,但 Docker Machine 创建的虚拟机是使用 boot2docker linux 系统,不符合 Kubernetes 集群节点主机的要求,连 apt-get 命令工具都没有,所以还是下载个 ubuntu server 创建虚拟机吧。minikube 使用的是 embedded Linux Distribution (Buildroot) 作虚拟机系统,你也可以尝试使用 Buildroot 创建虚拟机。

手工安装 ubuntu server 系统并不简单,有很多步骤需要选择和操作。应该有相应的自动化命令行工具做这种事情。

安装好虚拟机 Ubuntu server 系统后使用 Hyper-V connect 登录虚拟机系统或者使用 PuTTY 这种 ssh 工具登录(使用 PuTTY 工具更好,对编辑终端命令支持好一些)。

Disable Swap Momery

  • swapoff -a
  • /etc/fstab 文件中删除 swap 相关的条目,例如包含 /swap.img 的这一行
  • swapon --summary 确认没有 Swap Momery

Install kubeadm

虚拟机准备好了,接下来就可以在他上面安装 Kubernetes master 节点所需软件和创建集群了,根据 https://kubernetes.io/docs/tasks/tools/install-kubeadm/ 教程安装 Docker, kubelet, kubeadm 和 kubectl 工具。我们是 Ubuntu 系统,所以使用以下命令(使用sudo -i进入 root 权限模式)安装:

  • 在虚拟机里安装 Docker
    apt-get update
    apt-get install -y docker.io
    
  • 安装 kubelet kubeadm kubectl
    apt-get update && apt-get install -y apt-transport-https curl
    curl -s https://packages.cloud.google.com/apt/doc/apt-key.gpg | apt-key add -
    cat <<EOF >/etc/apt/sources.list.d/kubernetes.list
    deb http://apt.kubernetes.io/ kubernetes-xenial main
    EOF
    apt-get update
    apt-get install -y kubelet kubeadm kubectl
    

如果你依照步骤操作了,仍然遇到错误
E: Unable to locate package kubelet
E: Unable to locate package kubeadm
E: Unable to locate package kubectl
则可能跟我一样安装的是 32bit 的 ubuntu server 系统,因为 Docker 只支持 64bit 系统,所以 Kubernetes 要安装在 64bit 系统上,所以重新下载个 ubuntu server amd64 iso 安装虚拟机。

Configure cgroup driver used by kubelet on Master Node

// 不确定什么情况下需要做这步

cat /etc/systemd/system/kubelet.service.d/10-kubeadm.conf
[Service] Environment="KUBELET_KUBECONFIG_ARGS=--bootstrap-kubeconfig=/etc/kubernetes/bootstrap-kubelet.conf --kubeconfig=/etc/kubernetes/kubelet.conf" Environment="KUBELET_SYSTEM_PODS_ARGS=--pod-manifest-path=/etc/kubernetes/manifests --allow-privileged=true" Environment="KUBELET_NETWORK_ARGS=--network-plugin=cni --cni-conf-dir=/etc/cni/net.d --cni-bin-dir=/opt/cni/bin" Environment="KUBELET_DNS_ARGS=--cluster-dns=10.96.0.10 --cluster-domain=cluster.local" Environment="KUBELET_AUTHZ_ARGS=--authorization-mode=Webhook --client-ca-file=/etc/kubernetes/pki/ca.crt" Environment="KUBELET_CADVISOR_ARGS=--cadvisor-port=0" Environment="KUBELET_CERTIFICATE_ARGS=--rotate-certificates=true --cert-dir=/var/lib/kubelet/pki" ExecStart= ExecStart=/usr/bin/kubelet $KUBELET_KUBECONFIG_ARGS $KUBELET_SYSTEM_PODS_ARGS $KUBELET_NETWORK_ARGS $KUBELET_DNS_ARGS $KUBELET_AUTHZ_ARGS $KUBELET_CADVISOR_ARGS $KUBELET_CERTIFICATE_ARGS $KUBELET_EXTRA_ARGS
docker info | grep -i cgroup
Cgroup Driver: cgroupfs WARNING: No swap limit support

设置参数

sed -i "s/cgroup-driver=systemd/cgroup-driver=cgroupfs/g" /etc/systemd/system/kubelet.service.d/10-kubeadm.conf
cat /etc/systemd/system/kubelet.service.d/10-kubeadm.conf
[Service] Environment="KUBELET_KUBECONFIG_ARGS=--bootstrap-kubeconfig=/etc/kubernetes/bootstrap-kubelet.conf --kubeconfig=/etc/kubernetes/kubelet.conf" Environment="KUBELET_SYSTEM_PODS_ARGS=--pod-manifest-path=/etc/kubernetes/manifests --allow-privileged=true" Environment="KUBELET_NETWORK_ARGS=--network-plugin=cni --cni-conf-dir=/etc/cni/net.d --cni-bin-dir=/opt/cni/bin" Environment="KUBELET_DNS_ARGS=--cluster-dns=10.96.0.10 --cluster-domain=cluster.local" Environment="KUBELET_AUTHZ_ARGS=--authorization-mode=Webhook --client-ca-file=/etc/kubernetes/pki/ca.crt" Environment="KUBELET_CADVISOR_ARGS=--cadvisor-port=0" Environment="KUBELET_CERTIFICATE_ARGS=--rotate-certificates=true --cert-dir=/var/lib/kubelet/pki" ExecStart= ExecStart=/usr/bin/kubelet $KUBELET_KUBECONFIG_ARGS $KUBELET_SYSTEM_PODS_ARGS $KUBELET_NETWORK_ARGS $KUBELET_DNS_ARGS $KUBELET_AUTHZ_ARGS $KUBELET_CADVISOR_ARGS $KUBELET_CERTIFICATE_ARGS $KUBELET_EXTRA_ARGS

Then restart kubelet:

systemctl daemon-reload
systemctl restart kubelet

Create Cluster

按照官方文档 Create cluster using kubeadm 创建 Kubernetes cluster

Initializing your master

The master is the machine where the control plane components run, including etcd (the cluster database) and the API server (which the kubectl CLI communicates with).

使用命令 kubeadm init 初始化集群的 master 节点

kubeadm init
[init] Using Kubernetes version: v1.10.4 [init] Using Authorization modes: [Node RBAC] [preflight] Running pre-flight checks. [WARNING SystemVerification]: docker version is greater than the most recently validated version. Docker version: 17.12.1-ce. Max validated version: 17.03 [WARNING FileExisting-crictl]: crictl not found in system path Suggestion: go get github.com/kubernetes-incubator/cri-tools/cmd/crictl [preflight] Starting the kubelet service [certificates] Generated ca certificate and key. [certificates] Generated apiserver certificate and key. [certificates] apiserver serving cert is signed for DNS names [kubemaster kubernetes kubernetes.default kubernetes.default.svc kubernetes.default.svc.cluster.local] and IPs [10.96.0.1 172.20.84.213] [certificates] Generated apiserver-kubelet-client certificate and key. [certificates] Generated etcd/ca certificate and key. [certificates] Generated etcd/server certificate and key. [certificates] etcd/server serving cert is signed for DNS names [localhost] and IPs [127.0.0.1] [certificates] Generated etcd/peer certificate and key. [certificates] etcd/peer serving cert is signed for DNS names [kubemaster] and IPs [172.20.84.213] [certificates] Generated etcd/healthcheck-client certificate and key. [certificates] Generated apiserver-etcd-client certificate and key. [certificates] Generated sa key and public key. [certificates] Generated front-proxy-ca certificate and key. [certificates] Generated front-proxy-client certificate and key. [certificates] Valid certificates and keys now exist in "/etc/kubernetes/pki" [kubeconfig] Wrote KubeConfig file to disk: "/etc/kubernetes/admin.conf" [kubeconfig] Wrote KubeConfig file to disk: "/etc/kubernetes/kubelet.conf" [kubeconfig] Wrote KubeConfig file to disk: "/etc/kubernetes/controller-manager.conf" [kubeconfig] Wrote KubeConfig file to disk: "/etc/kubernetes/scheduler.conf" [controlplane] Wrote Static Pod manifest for component kube-apiserver to "/etc/kubernetes/manifests/kube-apiserver.yaml" [controlplane] Wrote Static Pod manifest for component kube-controller-manager to "/etc/kubernetes/manifests/kube-controller-manager.yaml" [controlplane] Wrote Static Pod manifest for component kube-scheduler to "/etc/kubernetes/manifests/kube-scheduler.yaml" [etcd] Wrote Static Pod manifest for a local etcd instance to "/etc/kubernetes/manifests/etcd.yaml" [init] Waiting for the kubelet to boot up the control plane as Static Pods from directory "/etc/kubernetes/manifests". [init] This might take a minute or longer if the control plane images have to be pulled. [apiclient] All control plane components are healthy after 51.025111 seconds [uploadconfig] Storing the configuration used in ConfigMap "kubeadm-config" in the "kube-system" Namespace [markmaster] Will mark node kubemaster as master by adding a label and a taint [markmaster] Master kubemaster tainted and labelled with key/value: node-role.kubernetes.io/master="" [bootstraptoken] Using token: 3b7u48.w4bidn6xs5gy6zmx [bootstraptoken] Configured RBAC rules to allow Node Bootstrap tokens to post CSRs in order for nodes to get long term certificate credentials [bootstraptoken] Configured RBAC rules to allow the csrapprover controller automatically approve CSRs from a Node Bootstrap Token [bootstraptoken] Configured RBAC rules to allow certificate rotation for all node client certificates in the cluster [bootstraptoken] Creating the "cluster-info" ConfigMap in the "kube-public" namespace [addons] Applied essential addon: kube-dns [addons] Applied essential addon: kube-proxy Your Kubernetes master has initialized successfully! To start using your cluster, you need to run the following as a regular user: mkdir -p $HOME/.kube sudo cp -i /etc/kubernetes/admin.conf $HOME/.kube/config sudo chown $(id -u):$(id -g) $HOME/.kube/config You should now deploy a pod network to the cluster. Run "kubectl apply -f [podnetwork].yaml" with one of the options listed at: https://kubernetes.io/docs/concepts/cluster-administration/addons/ You can now join any number of machines by running the following on each node as root: kubeadm join 172.20.84.213:6443 --token 3b7u48.w4bidn6xs5gy6zmx --discovery-token-ca-cert-hash sha256:182fba1ecb85fd4dbfbf478b12a40143d2c7de9f16ba2ea85263648a74b010b1

首先依照日志给出的命令先把 kubectl 工具配好

mkdir -p $HOME/.kube
sudo cp -i /etc/kubernetes/admin.conf $HOME/.kube/config
sudo chown $(id -u):$(id -g) $HOME/.kube/config

其次安装网络扩展组件下一步要做。

最后记下来 kubeadm join ... 这行命令,后面添加 Worker 节点要用到。

  • 如果遇到下面错误说明你需要执行 swapoff -a 使用 swapon --summary 查看确保没有 swap
    [ERROR Swap]: running with swap on is not supported. Please disable swap
    
  • 如果出现下面错误,那就照做 systemctl enable docker.service
    [WARNING Service-Docker]: docker service is not enabled, please run 'systemctl enable docker.service'
    
Installing a pod network

Kubernetes cluster 需要安装网络扩展组件用来扁平化容器之间的网络通信,为什么需要单独的网络扩展组件可以参考 Kubernetes Concepts / Cluster Networking

我们这里选择 Weave Net

sysctl net.bridge.bridge-nf-call-iptables=1
net.bridge.bridge-nf-call-iptables = 1
kubectl apply -f "https://cloud.weave.works/k8s/net?k8s-version=$(kubectl version | base64 | tr -d '\n')"
serviceaccount "weave-net" created clusterrole.rbac.authorization.k8s.io "weave-net" created clusterrolebinding.rbac.authorization.k8s.io "weave-net" created role.rbac.authorization.k8s.io "weave-net" created rolebinding.rbac.authorization.k8s.io "weave-net" created daemonset.extensions "weave-net" created

pod network 安装成功之后,用下面命令查看 kube-dns 这个 pod 的状态,当其为 Running 时说明正式成功运行起来了
kubectl get pods --all-namespaces

然后就可以为我们的 Kubernetes cluster 加入节点主机了。

Join Nodes

在 Kubernetes master 主机上使用 kubeadm init 初始化 Kubernetes master 节点时终端输出日志最后有一行命令用来把子虚拟机节点加入 Kubernetes Cluster 中,如下

kubeadm join 10.59.176.211:8443 --token mceq67.bit1jg2iafbz8xjv --discovery-token-ca-cert-hash sha256:c870fa8cf3ef944e0d695655604110debeef650ed78f4d07ef83f3442825cb46

按照创建和安装 master 节点虚拟机一样的步骤再创建一个 ubuntu server 系统的虚拟机,然后安装好 Docker, kubelet, kubeadm 和 kubectl 工具。

这是一个重复劳动,所以我们需要像 Vagrant 这样的自动化工具

运行上面的命令把此虚拟机加入 Kubernetes cluster master 节点,如果遇到什么问题需要重新运行命令,则先要运行命令 kubeadm reset 重置环境,然后重新运行 join 命令。

kubeadm join 10.59.176.211:6443 --token psp2gi.6agdgib6ff2r0mla --discovery-token-ca-cert-hash sha256:5b6c9086b74cb0ebc57a8608245c8114d429143183ab3ac4ffda9134b64aaceb
[preflight] Running pre-flight checks. [WARNING SystemVerification]: docker version is greater than the most recently validated version. Docker version: 17.12.1-ce. Max validated version: 17.03 [WARNING FileExisting-crictl]: crictl not found in system path Suggestion: go get github.com/kubernetes-incubator/cri-tools/cmd/crictl [preflight] Starting the kubelet service [discovery] Trying to connect to API Server "10.59.176.211:6443" [discovery] Created cluster-info discovery client, requesting info from "https://10.59.176.211:6443" [discovery] Requesting info from "https://10.59.176.211:6443" again to validate TLS against the pinned public key [discovery] Cluster info signature and contents are valid and TLS certificate validates against pinned roots, will use API Server "10.59.176.211:6443" [discovery] Successfully established connection with API Server "10.59.176.211:6443" This node has joined the cluster: * Certificate signing request was sent to master and a response was received. * The Kubelet was informed of the new secure connection details. Run 'kubectl get nodes' on the master to see this node join the cluster.

日志会提示你,在 master 主机上运行命令 kubectl get nodes 查看此 node 节点主机已经加入到了 Kubernetes cluster,如下

kubectl get nodes
NAME STATUS ROLES AGE VERSION kubemaster Ready master 15m v1.10.4 kubenode1 NotReady <none> 28s v1.10.3

可以看到 kubenode1 节点还没有 Ready , 过一会再查看就会是 Ready 状态了。

我之前曾经试图把 node 节点主机加入到 Minikube 主机的 Kubernetes cluster , node 主机上运行的 kubeadm join 命令输出都支持,但 Minikube 就是没有 node 加进来。

Troubleshoting

Troubleshot after Reboot

当我重启 master 节点虚拟机后 Kubernetes cluster 没有启动,查看 Kubelet 服务运行状态

systemctl status kubelet
kubelet.service - kubelet: The Kubernetes Node Agent Loaded: loaded (/lib/systemd/system/kubelet.service; enabled; vendor preset: enabled) Drop-In: /etc/systemd/system/kubelet.service.d └─10-kubeadm.conf Active: active (running) since Tue 2018-06-19 03:26:03 UTC; 1h 39min ago Docs: http://kubernetes.io/docs/ Main PID: 845 (kubelet) Tasks: 14 (limit: 2184) CGroup: /system.slice/kubelet.service └─845 /usr/bin/kubelet --bootstrap-kubeconfig=/etc/kubernetes/bootstrap-kubelet.conf --kubeconfig=/etc/kubernetes/kubelet.conf --pod-manifest-path

可以看到里面 Active: active (running) 则代表正常,否则可能遇到问题了。 再使用 journalctl 查看这个服务运行日志

journalctl -xeu kubelet

在我的输出里包含如下描述

--cgroups-per-qos enabled, but --cgroup-root was not specified.
failed to run Kubelet: Running with swap on is not supported

第一行不是问题,第二行说明系统的 swap 开启了,要关闭掉,因为我们之前少做了一步操作,现在重新操作如下

  • swapoff -a
  • /etc/fstab 文件中删除 swap 相关的条目,例如包含 /swap.img 的这一行

重新查看 swap 状态 swapon --summary 确保没有 swap 存在,然后再查看 kubelet 是否正常启动。

Swap Memory

关于 Swap 的问题,是 Kubernetes 从 v1.8.0 开始,如果工作节点主机的 swap memory 开启 Kubelet 默认会启动失败。 kubelet 有个参数 --fail-swap-on Default: true 指定了这个特性。建议不要设置成 false,因为 Kubelet 不管理 swap space,开启 swap 可能会造成不可预测的效率问题。详细请参考讨论kubernetes/issues/7294

Multiple Network Interfaces

当 Kubernetes 使用的 Master/Worker 主机系统安装了两个及以上的网络适配器(Network Interfaces)时,Kubernetes 默认选择使用默认的 Network Interface 作为其地址,但有时另外一个才是其需要的适配器地址时,就需要手工指定给他。

参见 Using kubeadm with multiple network interfaces.

Weave Net CrashLoopBackOff

Problem

安装了 Weave Net 组件后,加入一个 Worker 节点后,此节点的 weave-net 循环崩溃,状态为 CrashLoopBackOff。

查看此 pod 的日志,显示不能连到地址 10.96.0.1,此地址看起来像 apiserver 的地址

root@kubemaster:~# kubectl logs weave-net-rd99x -n kube-system -c weave
FATA: 2018/06/27 05:35:46.045930 [kube-peers] Could not get peers: Get https://10.96.0.1:443/api/v1/nodes: dial tcp 10.96.0.1:443: i/o timeout
Failed to get peers

通过查看服务确认一下是 kubernetes 服务的即 apiserver 的地址

root@kubemaster:~# kubectl get svc
NAME         TYPE        CLUSTER-IP   EXTERNAL-IP   PORT(S)   AGE
kubernetes   ClusterIP   10.96.0.1    <none>        443/TCP   2h

那么问题就是 Worker 节点上的 weave-net pod 连不上 Master 节点的 apiserver 地址,他们是通过 cluster-ip 通信的,而 kube-proxy 负责此项任务。 查看 Master 节点上 kube-proxy pod 日志可以发现问题

root@kubemaster:~# kubectl logs kube-proxy-98b7s -n kube-system
I0627 03:44:30.494219       1 feature_gate.go:226] feature gates: &\{\{\} map[]}
W0627 03:44:30.780309       1 server_others.go:290] Can't use ipvs proxier, trying iptables proxier
I0627 03:44:30.781468       1 server_others.go:140] Using iptables Proxier.
W0627 03:44:30.977868       1 proxier.go:311] clusterCIDR not specified, unable to distinguish between internal and external traffic
I0627 03:44:30.978159       1 server_others.go:174] Tearing down inactive rules.
I0627 03:44:31.140425       1 server.go:444] Version: v1.10.5
I0627 03:44:31.178436       1 conntrack.go:98] Set sysctl 'net/netfilter/nf_conntrack_max' to 131072
I0627 03:44:31.178659       1 conntrack.go:52] Setting nf_conntrack_max to 131072
I0627 03:44:31.182668       1 conntrack.go:83] Setting conntrack hashsize to 32768
I0627 03:44:31.182815       1 conntrack.go:98] Set sysctl 'net/netfilter/nf_conntrack_tcp_timeout_established' to 86400
I0627 03:44:31.183028       1 conntrack.go:98] Set sysctl 'net/netfilter/nf_conntrack_tcp_timeout_close_wait' to 3600
I0627 03:44:31.189000       1 config.go:202] Starting service config controller
I0627 03:44:31.189028       1 controller_utils.go:1019] Waiting for caches to sync for service config controller
I0627 03:44:31.189069       1 config.go:102] Starting endpoints config controller
I0627 03:44:31.189075       1 controller_utils.go:1019] Waiting for caches to sync for endpoints config controller
I0627 03:44:31.290423       1 controller_utils.go:1026] Caches are synced for endpoints config controller
I0627 03:44:31.290491       1 controller_utils.go:1026] Caches are synced for service config controller

日志 clusterCIDR not specified, unable to distinguish between internal and external traffic 显示 clusterCIDR 没有指定,不能区分 internal 和 external 数据流。你还可以通过下面全局搜索关键字的方式查看日志

root@kubemaster:~# kubectl cluster-info dump | grep -i cidr
                "PodCIDR": "",
                "PodCIDR": "",
                "PodCIDR": "",
I0627 03:36:22.170690       1 core.go:149] Will not configure cloud provider routes for allocate-node-cidrs: false, configure-cloud-routes: true.
W0627 03:44:30.977868       1 proxier.go:311] clusterCIDR not specified, unable to distinguish between internal and external traffic
W0627 03:36:27.770563       1 proxier.go:311] clusterCIDR not specified, unable to distinguish between internal and external traffic
W0627 05:15:22.445973       1 proxier.go:311] clusterCIDR not specified, unable to distinguish between internal and external traffic

Solution

各种文档并没有明确说明要设置 cluster CIDR,一般都会有默认的。但可能是我使用的虚拟机 Ubuntu 设置了两个 network interfaces 的原因,导致 Kubernetes 在区分流量路径时出现问题。

在 Kubernetes 官方安装文档 Creating a single master cluster with kubeadm 里指出了在安装 pod network add-on 时要注意有些是需要指定 --pod-network-cidr 参数的。 那么就重新初始化一下

root@kubemaster:~# kubeadm init --apiserver-advertise-address=192.168.99.100 --service-cidr=10.96.0.0/12 --pod-network-cidr=10.32.0.0/16

同样是因为我的虚拟机系统安装了两个 network interfaces 而 Kubernetes 会选择默认的,所以需要手工指定 apiserver 使用的 IP 地址 by --apiserver-advertise-address=192.168.99.100

References

Similar Posts

Comments

Back to Top