- Series
- Prerequisites
- Procedure
- Local Test
- Next Steps
SAP HANA Cloud Platform 提供了本地开发的能力,使你可以在本地创建开发XS应用程序,并运行在HANA Cloud上。 本文项目完整代码可以参见Github
Series
- How to develop an XS application on the SAP HANA Cloud Platform
- How to develop an XS Odata Service by CDS on the HCP
- How to Create a Fiori app Using OData service on the HCP
- How to Config Fiori App in Fiori Launchpad
- How to use HTTP Destination in HANA and HANA Cloud
- HANA Cloud Connector
Prerequisites
- 有一个SAP HANA Cloud trial landscape账号
- 有一定的HANA基础知识
Procedure
Login HCP Cockpit
登录https://account.hanatrial.ondemand.com/cockpit
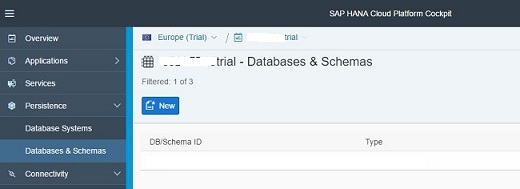
Create Database
进入到 Databses & Schemas 面板
创建一个新的Database,Database System选择HANA MDC(<trial>)
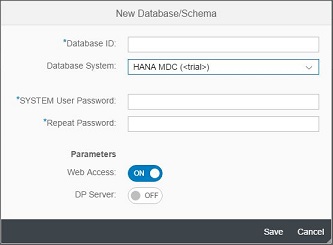
The SAP HANA Multitenant Database Containers (MDC) feature enables hosting multiple SAP HANA databases on a single SAP HANA system. All tenant databases in the same system share the same system resources (memory and CPU cores) but each tenant database is fully isolated with its own database users, catalog, repository, persistence (data files and log files) and services. And now you can use all this on a trial landscape.
You can have only one tenant database per account.
创建成功后进入BD界面,显示此Database的一些重要信息

之后我们访问此DB的host地址均为 https://<DBName><AccountName>.hanatrial.ondemand.com
HANA Cockpit init User
从 Database Overview 界面打开 SAP HANA Cockpit 链接,使用 SYSTEM 用户登录,页面会提示要为用户分配角色,点击 OK 系统会分配几个 Roles 给此用户,然后就会打开 HANA Cockpit 界面。此程序里有一些基础的 Database Administration 应用。
HANA Cockpit 中其中一个应用就是 Manage Roles and Users App, 打开即进入 HANA IDE Security (/sap/hana/ide/security/) 界面,在此程序里便可为用户添加 Role 。
打开 System 用户,可以看到刚才系统为其分配的三个 Roles:
- sap.hana.admin.roles::Administrator
- sap.hana.ide.roles::SecurityAdmin
- sap.hana.ide.roles::TraceViewer
如果让此用户成为开发者,可以分配角色 sap.hana.ide.roles::Developer 给他。
Update: 2018-05-10
Open Development Tools
打开链接 Development Tools: SAP HANA Web-based Development Workbench 使用创建Database设置的用户登录 里面有四个工具:
- Editor : Create, edit, execute, debug and manage HANA Respository artifacts
- Catalog : Create, edit, execute and manage HANA DB SQL catalog artifacts
- Security : Create users, create roles, assign objects and manage security
- Traces : View, download traces for HANA applications, set trace levels
在执行过程中可能遇到权限问题,可以打开 Security (/sap/hana/ide/security/) 为用户添加相应 Roles, e.g. sap.hana.ide.roles::Developer
Create Package
打开 SAP HANA Web-based Development Workbench: Editor 工具, 可以看到根目录为Content,即HANA Respository。
创建一个新的Package “digital-account“, 我们的项目代码就放在此package下面。
Assign Delivery Unit (Optional)
为了方便代码传输管理,为此package分配一个delivery unit。
Open Application Lifecycle Management
HANA Application Lifecycle Management路径为 /sap/hana/xs/lm
需要权限用户角色为 sap.hana.xs.lm.roles::Administrator
Create Delivery Unit
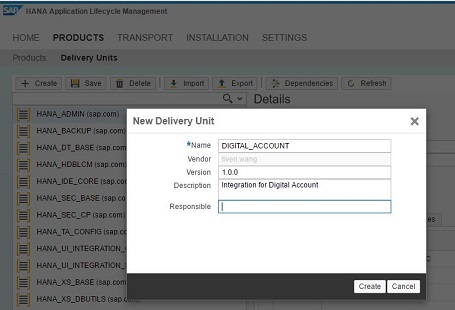
创建之前需要在 SETTINGS 设置 Vendor
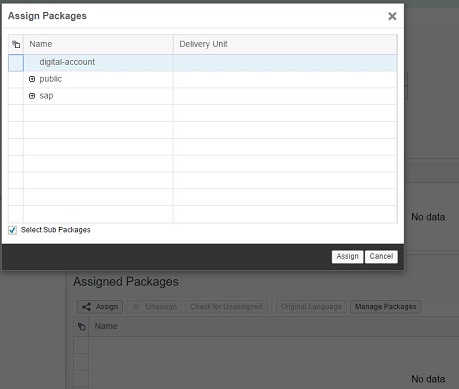
Assign Delivery Unit
可以在这里分配package给Delivery Unit,也可以在Editor里Assign package to Delivery Unit。
Delivery Unit管理的详细教程可以参见附录1
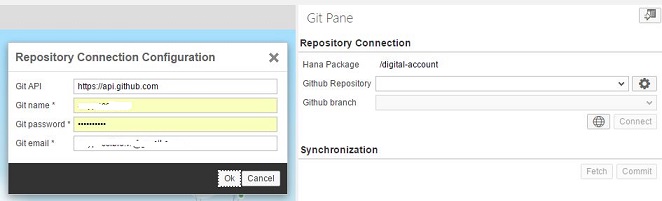
Synchronize with Github (Optional)
为了向现代化的代码管理工具上靠拢,Editor里增加了与Github和Github企业版的代码库同步功能。
在需要同步的Package上右键菜单中点击Synchronize with Github开打Git Pane。 输入Github用户信息,确定后并设置respository和branch,然后就可以双向同步代码了。
Create Application
在package上右键 Create Application , 或者手动创建以下几个文件
-
.xsapp : 标志此package是一个application, 可以被http访问, 文件内容为空
-
.xsaccess : 控制此application的访问属性
-
index.html : applicaton的主页面,可选
Set Application
这里我们需要更改.xsaccess一些属性。
"authentication" : null为了方便测试及之后的供数字账号事件调用,需要设置匿名访问权限,所以这里授权方式为空。"anonymous_connection": "digital-account::DigAccMessage"在匿名用户访问系统的情况下这里需要提供一个数据库连接设置,以便授予匿名用户访问数据库的权限。"cors" : {"enabled" : true}显然如果使数字账号服务器可以调用此API的话,需要设置跨域访问。"force_ssl" : true使用ssl连接更安全。"prevent_xsrf" : false: 因为数字账号服务器并不能提供xsrf token,所以我们关闭此功能
.xsaccess 文件完整代码
{
    "exposed": true,
    "authentication": null,

    "mime_mapping": [{
        "extension": "jpg",
        "mimetype": "image/jpeg"
    }],
    "force_ssl": true,
    "enable_etags": true,
    "prevent_xsrf": false,
    "anonymous_connection": "digital-account::DigAccMessage",
    "cors": [{
        "enabled": true
    }],
    "cache_control": "no-cache, no-store",
    "default_file": "index.html"
}
而 .xsapp 文件内容为空
Access Application
激活代码后,访问 /digital-account/index.html 出现相应页面代表application创建成功。
Create XS SQL Connection (Optional)
如果用户使用账号登录HANA XS application的话,那么程序访问数据库同样是使用此账号。 如果用户匿名登录或者程序要使用不同于登录帐号的凭证去访问数据库的话,则需要创建独立的SQL Connection Config文件。
Create DigAccMessage.xssqlcc
在package下创建一个文件DigAccMessage.xssqlcc
{
  "description" : "Admin SQL connection"
}
Config SQL Connection
选中package,点击toolbar里的Maintain Details,转到XS Runtime Configuration Details页面。路径为/sap/hana/xs/admin/index.html, 需要用户拥有相关权限。 这里可以维护XS运行时的一些配置,包括这里的SQL Connection Configurations。 在package下可以看到名为DigAccMessage.xssqlcc的SQL Connection Configuration,点击并维护其所用User。
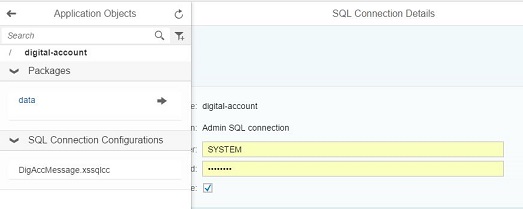
这里为了简单起见我们使用创建DB时创建的账号SYSTEM,正式开发中我们可能需要赋予其权限更小一些的账号, 或者使用参数role_for_auto_user的方式只分配指定角色给自动账号。关于HANA权限的管理我们希望后续篇章能介绍。
Create Data Model
Create Schema
创建subpackage data 创建文件 DigAcc.hdbschema , schema name = “database schema name”
schema_name = "DigAcc";
Create Data Models
定义数据模型我们使用新式的CDS方式,文件后缀名为.hdbdd, 关于CDS技术信息我们会在后续篇章做更详细介绍。
创建文件 data/DigAccMessage.hdbdd
namespace "digital-account".data;

@Schema: 'DigAcc'
context DigAccMessage {

	type Content : String(5000);

	entity Message {
		key id : Integer;
		createdTime: UTCTimestamp;
		content: Content;
	};
};
Grant Object Privileges to User
为了使相关用户能维护此Schema,需要赋予用户Object Privileges of DigAcc
Create xsjs
.xsjs文件类型即是XS engine的http server运行时文件。
Create xsjs file
为了能接受数字账号发来的请求,我们要创建一个http server运行时文件 line-receiver.xsjs。
http请求处理入口逻辑程序为
var contentType;

// Check Content type headers and parameters
function validateInput() {

	// Check content-type is application/json
	contentType = $.request.contentType;

	if ( contentType === null || contentType.startsWith("application/json") === false){
		 $.response.status = $.net.http.INTERNAL_SERVER_ERROR;
		 $.response.setBody("Wrong content type request use application/json");
		return false;
	}

	return true;
}

// Request process
function processRequest(){
    if (validateInput()){
		try {
		    switch ( $.request.method ) {
		        //Handle your GET calls here
		        case $.net.http.GET:
		            $.response.setBody(JSON.stringify(handleGet()));
		            break;
		            //Handle your POST calls here
		        case $.net.http.POST:
		            $.response.setBody(JSON.stringify(handlePost()));
		            break;
		        case $.net.http.DEL:
		            //
		            break;
		        //Handle your other methods: PUT, DELETE
		        default:
		            $.response.status = $.net.http.METHOD_NOT_ALLOWED;
		            $.response.setBody("Wrong request method");
		            break;
		    }
		    $.response.contentType = "application/json";
		} catch (e) {
		    $.response.setBody("Failed to execute action: " + e.toString());
		}
	}
}

// Call request processing
processRequest();
Save Post Message
当数字账号服务器发来post请求时,我们需要保存它的message,这时则需要连接数据库并执行SQL创建记录。 因为我们使用匿名请求,所以在创建DB Connection时需要指定SQL Connection Configuration,这里则是指定之前创建的.xssqlcc。
如果使用默认用户登录账号连接数据库,则参数置空
$.db.getConnection();
// Global constant variables
var conSQLConnection = "digital-account::DigAccMessage",
	conSchema = "\"DigAcc\"",
	conMessageTable = "\"digital-account.data::DigAccMessage.Message\"";

function saveMessage(content) {
	var body;

	var id = 0;
	var conn = $.db.getConnection(conSQLConnection); // Create Connection used SQL Connection
	conn.prepareStatement("SET SCHEMA " + conSchema).execute(); // Setting the SCHEMA

	var pStmt = conn.prepareStatement("select max( \"id\" ) from " + conMessageTable);
	var rs = pStmt.executeQuery();
	if (rs.next()) {
		id = Number(rs.getNString(1)) + 1;
	}
	rs.close();

	pStmt = conn.prepareStatement("insert INTO "+conMessageTable+'("id", "createdTime", "content") values(?, now(), ?)');
	pStmt.setInteger(1, id);
	pStmt.setNString(2, JSON.stringify(content));
	pStmt.executeUpdate();
	pStmt.close();

	// All database changes must be explicitly commited
	conn.commit();

	$.response.status = $.net.http.OK;
	body = {
			id: id,
			info: "Success!"
		};

	if (conn) {
		conn.close();
	}
	return body;
}

//Implementation of POST call
function handlePost() {
	var bodyStr = $.request.body ? $.request.body.asString() : undefined;
	if ( bodyStr === undefined ){
		 $.response.status = $.net.http.INTERNAL_SERVER_ERROR;
		 return {"myResult":"Missing BODY"};
	}
	return saveMessage(JSON.parse(bodyStr));
}
Query Saved Messages
最后创建Get请求的逻辑来查询保存下来的全部Messages
//Implementation of GET call
function handleGet() {
    var messages = [];
	var conn = $.db.getConnection(conSQLConnection);
	conn.prepareStatement("SET SCHEMA " + conSchema).execute(); // Setting the SCHEMA
	var pStmt = conn.prepareStatement('select "id", "createdTime", "content" from ' + conMessageTable);
	var rs = pStmt.executeQuery();
	while (rs.next()) {
		messages.push({
			id: rs.getInteger(1),
			createdTime: rs.getTimestamp(2),
			content: rs.getNString(3)
		});
	}
	rs.close();

	if (conn) {
		conn.close();
	}

	// Retrieve data here and return results in JSON/other format
	$.response.status = $.net.http.OK;
	return {"result": messages};
}
Using XS Destination
在HANA中XS程序想要调用外部网络服务需要通过HTTP Destination ,关于如何创建和使用HTTP Destination请参考 How to use HTTP Destination in HANA and HANA Cloud
Local Test
Test Post
使用下面body内容post /digital-account/line-receiver.xsjs , 会得到成功信息
{
  "result": [
    {
      "content":{
        "text":"Hello world!"
      },
      "createdTime":1475033537220,
      "eventType":"138311609000106303",
      "id":"WB1519-3872640834"
    }
  ]
}
别忘记添加
Content-Type=application/json在http header
Test Get Messages
get /digital-account/line-receiver.xsjs
{
  "result": [
    {
      "id": 1,
      "createdTime": "2016-10-10T06:08:33.066Z",
      "content": "{\"result\":[{\"content\":{\"text\":\"Hello world!\"},\"createdTime\":1475033537220,\"eventType\":\"138311609000106303\",\"id\":\"WB1519-3872640834\"}]}"
    }
  ]
}
Next Steps
本篇我们介绍了初学者如何一步步在HANA Cloud Platform上创建XS application的过程,及简单配置。接下来我们会介绍
Comments