- Step 1. Setup Project
- Step 2. Publish App
- Step 3. Destinations
- Step 4. Node version
- Step 5. with Build Tools
- Step 6. Debugging
- Next Steps
本系列文章我们将介绍如何为 SAP S4HANA Cloud 系统开发扩展程序 (Extension App),本篇是开始第一篇,介绍如何 Setup 起来一个 SAP CloudFoundry 平台的 Node.js Application 程序。 你可以直接从我 GitLab / s4hana-cloud-sdk-demo 克隆项目代码进行练习。
对于如何为 SAP S4HANA Cloud 系统开发应用程序,我们推荐使用 SAP Cloud Foundry Platform 开发应用程序。Cloud Foundry 应用开发遵循的理念是微服务 Microservices, 同时这个理念也被应用到了最新的 HANA XSA 开发模式上。所以在介绍 SAP S4HANA Cloud 应用开发时会涉及到 Microservices 的一些概念,读者可以留意。
关于 CloudFoundry 的详细教程可以参考我的另一系列文章 Try Cloud Foundry; 关于微服务的概念可以参考另一系列文章 Microservices;
Step 1. Setup Project
为 SAP S4HANA Cloud 开发应用,少不了使用 SAP 提供的 SAP Cloud SDK (之前叫 SAP S/4HANA Cloud SDK ) 来提高开发效率。SAP Cloud SDK 提供了 Java 版本的还有 JavaScript 版本的,而我们推荐 JavaScript 版本里的 TypeScript 版本,因为 TypeScript 确实是一个好用的 JavaScript 增强版。

代码编辑器 IDE 我们推荐 VS Code
我们的项目目录结构将会是如下
sap-cloud-sdk-demo
|-- app
|   -- src
|   |  | index.ts
|   |package.json
|   |tsconfig.json
|manifest.yml
|xs-security.json
配置 SAP NPM Registry 库
npm config set @sap:registry https://npm.sap.com,这样在安装npm install @sap/<node_package>这样的 SAP 依赖包时就会从此 Registry 拉取。
当你下载好项目源代码后,进入文件夹 app 里,运行下面命令安装 NPM 依赖包
npm i
然后运行 npm run watch:local 监视编译运行项目代码,访问控制台输出的链接 Express server listening on port http://localhost:6001 便可访问项目的主页。
ts-node is TypeScript execution and REPL for node.js. NPX can replace globally installed packages. Instead of the usual route of doing an npm i -g package then use the package, you can achieve the same with npx package.
修改 business-partner-route.ts 中以下部分的 API Key 便可以访问 SAP API Business Hub 提供的 sandbox api 数据
.withCustomHeaders({
    'APIKey': '<your API key from SAP API Business Hub>'
})
.execute({
  url: 'https://sandbox.api.sap.com/s4hanacloud/'
});
Step 2. Publish App
更改 manifest.yml 配置中的 Application name ,先删掉文件中的 services 配置,因为后面才会用到。
Build TypeScript
在发布到云上之前我们要构建和打包 TypeScript Application,执行命令 npm run ci-build 会将 js 代码生成在 dist 文件夹内。
后面讲到 Grunt 工具时,可以使用
grunt命令构建
Push
在项目根目录(即 manifest.yml 所在目录 )执行 cf push 进行部署项目
λ cf push
Pushing from manifest to org Ptrial_trial / space dev as i.tiven.wang@gmail.com...
Using manifest file c:\Users\tiven.wang\Documents\GitLab\sap-cloud-sdk-demo\manifest.yml
Getting app info...
Updating app with these attributes...
  name:                my-cloud-sdk-demo
  path:                C:\Users\tiven.wang\Documents\GitLab\sap-cloud-sdk-demo\app
  buildpacks:
    nodejs_buildpack
  command:             node dist/index.js
  disk quota:          1G
  health check type:   port
  instances:           1
  memory:              256M
  stack:               cflinuxfs3
  services:
    my-destination
    my-xsuaa
  routes:
    my-cloud-sdk-demo-balanced-baboon.cfapps.eu10.hana.ondemand.com

Updating app my-cloud-sdk-demo...
Mapping routes...
Comparing local files to remote cache...
Packaging files to upload...
Uploading files...
 37.71 KiB / 37.71 KiB [==========================================================================================] 100.00% 1s

Waiting for API to complete processing files...

Stopping app...

Staging app and tracing logs...
   Downloading nodejs_buildpack...
   Downloaded nodejs_buildpack
   Cell 584f85e8-d609-46fd-bc59-f4d3e9b42db2 creating container for instance a4942a4a-7cf6-493e-b1c2-d0c4d54681ba
   Cell 584f85e8-d609-46fd-bc59-f4d3e9b42db2 successfully created container for instance a4942a4a-7cf6-493e-b1c2-d0c4d54681ba
   Downloading build artifacts cache...
   Downloading app package...
   Downloaded app package (37.6K)
   Downloaded build artifacts cache (19.7M)
   -----> Nodejs Buildpack version 1.6.45
   -----> Installing binaries
          engines.node (package.json): 10.15.x
          engines.npm (package.json): unspecified (use default)
   -----> Installing node 10.15.2
          Copy [/tmp/cache/final/dependencies/5828255a00523e6dbe31f1970203e4499ef4f05f99883dfd856031937e379ff5/node-10.15.2-linux-x64-cflinuxfs3-05ea28a3.tgz]
          Using default npm version: 6.4.1
   -----> Installing yarn 1.13.0
          Copy [/tmp/cache/final/dependencies/b908d7fd5b7e3196dd2c6183012dc926e5a05820c60a77a0ae4f45155b1aaace/yarn-1.13.0-any-stack-125d40eb.tar.gz]          Installed yarn 1.13.0
   -----> Creating runtime environment
          PRO TIP: It is recommended to vendor the application's Node.js dependencies
          Visit http://docs.cloudfoundry.org/buildpacks/node/index.html#vendoring
          NODE_ENV=production
          NODE_HOME=/tmp/contents654788232/deps/0/node
          NODE_MODULES_CACHE=true
          NODE_VERBOSE=false
          NPM_CONFIG_LOGLEVEL=error
          NPM_CONFIG_PRODUCTION=true
   -----> Building dependencies
          Installing node modules (package.json + package-lock.json)
   added 94 packages from 71 contributors and audited 2494 packages in 3.746s
   found 0 vulnerabilities
          **WARNING** This app may not specify any way to start a node process
          See: https://docs.cloudfoundry.org/buildpacks/node/node-tips.html#start
   Exit status 0
   Uploading droplet, build artifacts cache...
   Uploading droplet...
   Uploading build artifacts cache...

Waiting for app to start...

name:              my-cloud-sdk-demo
requested state:   started
routes:            my-cloud-sdk-demo-baboon.cfapps.eu10.hana.ondemand.com
last uploaded:     Thu 23 May 10:02:03 CST 2019
stack:             cflinuxfs3
buildpacks:        nodejs

type:            web
instances:       1/1
memory usage:    256M
start command:   node dist/index.js
     state     since                  cpu    memory        disk       details
#0   running   2019-05-23T02:02:19Z   0.0%   40K of 256M   8K of 1G
成功后便可访问你的链接 https://my-cloud-sdk-demo-baboon.cfapps.eu10.hana.ondemand.com
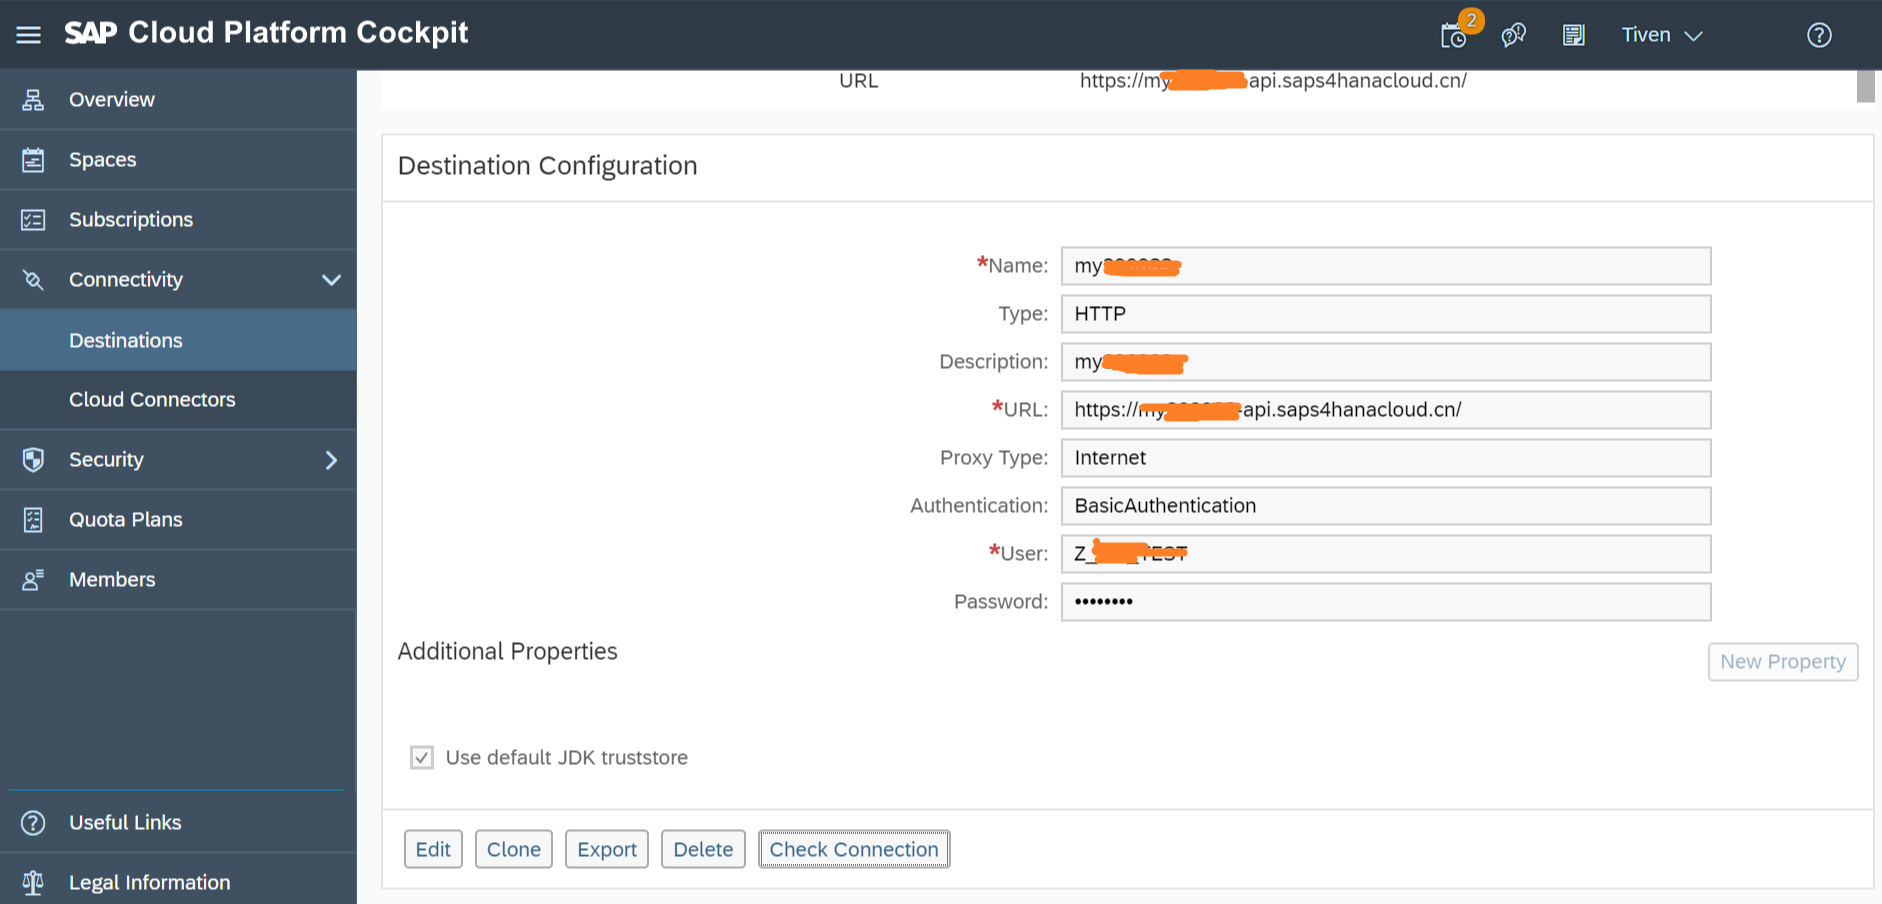
Step 3. Destinations
上一步我们直接 hardcode 了访问系统的 url,但实际生产环境中我们需要在外部配置,所以我们需要改为 SAP 的一贯作风使用 destination 访问外部系统。
把上一步访问 url 的地方改成如下
.execute({
  destinationName: 'Sandbox'
})
这里的 destinationName Sandbox 需要在环境中配置。在客户端开发环境测试话,我们用 dotenv 来模拟云上提供的环境变量,在 app 文件夹中创建文件 .env 内容如下
destinations=[{"name": "Sandbox", "url": "https://sandbox.api.sap.com/s4hanacloud/", "properties":[{"key":"ApiKey", "value":"<your API key from SAP API Business Hub>"}]}]
在执行的命令中加入参数 -r dotenv/config 如
npx ts-node -r dotenv/config src/
便可把 .env 变成环境变量值。
看到此错误是说我们的 destination 没有配置,如果配置了会通过 VCAP_SERVICES 环境变量传给程序
2019-05-22T08:41:37.81+0800 [APP/PROC/WEB/0] ERR (node:6) UnhandledPromiseRejectionWarning: Unhandled promise rejection (rejection id: 2): Error: Environment variable VCAP_SERVICES is defined but empty. This should not happen.
Destinations On SAP Cloud
如果是部署到 SAP Cloud 上需要先在 SAP Cloud Platform 上创建一个 Destination (名称要与程序里使用的 destinationName 一致),如下图
然后创建一个 destination 服务实例
λ cf create-service destination lite my-destination
正在以 i.tiven.wang@gmail.com 身分,於組織 P_trial/空間 dev 中建立服務實例 my-destination...
確定
然后把此服务名配置给应用程序(manifest.yml中),如果此时重新部署并执行程序会发现以下错误
2019-05-22T08:55:45.62+0800 [APP/PROC/WEB/0] ERR Service 'xsuaa' not found in 'VCAP_SERVICES'.
2019-05-22T08:55:45.63+0800 [APP/PROC/WEB/0] ERR (node:6) UnhandledPromiseRejectionWarning: Unhandled promise rejection (rejection id: 2): Error: NoXsuaaServiceFound: No binding to an XSUAA service instance found. Please make sure to bind an instance of the XSUAA service to your application!
这说明还有 xsuaa 服务需要配置,We need an instance of the XSUAA service. The XSUAA service is responsible for issuing access tokens that are necessary to talk to other services, like the destination service. For this service, we will need a bit of extra configuration in the form of a configuration file.
在项目根目录创建文件 xs-security.json 内容如下
{
  "xsappname": "<YOUR-APPLICATION-NAME>",
  "tenant-mode": "dedicated"
}
The value for xsappname again has to be unique across the whole of Cloud Foundry in SAP Cloud Platform, so make sure to choose a unique name or prefix.
用以下命令创建 xsuaa 服务实例
λ cf create-service xsuaa application my-xsuaa -c xs-security.json
正在以 i.tiven.wang@gmail.com 身分,於組織 Ptrial_trial/空間 dev 中建立服務實例 my-xsuaa...
確定
最后在 manifest.yml 配置中添加服务最终配置如下
applications:
  - name: my-cloud-sdk-demo
...
    services:
      - my-destination
      - my-xsuaa
重新 push 一遍, 便可
cf push
Step 4. Node version
关于 Node 的版本选择
如果遇到类似 TypeError: Object.entries is not a function 这样的错误,可能是由于有些功能 Node 的版本低而不支持,那么就要检查你所使用的 Node 版本,在 package.json 配置里添加
"engines": {
  "node": "10.15.x"
}
从下面错误信息里可以看到目前 SAP CloudFoundry 支持的 Node 版本列表,从中选择一款适合你的
engines.npm (package.json): unspecified (use default)
**ERROR** Unable to install node: no match found for 8.16.x in [6.16.0 6.17.0 8.15.0 8.15.1 9.11.2 10.15.1 10.15.2 11.10.0 11.10.1]
Failed to compile droplet: Failed to run all supply scripts: exit status 14
Exit status 223
Step 5. with Build Tools
以上部分我们都是通过 npm run 脚本命令来执行 build , package 等操作的,实属麻烦。Node.js Application 通常会使用一些 Build Tools 来做这些事情,这里我们就先介绍一个常用的构建工具 Grunt. 关于如何为一个 TypeScript 的 Node.js Application 添加 Grunt 工具可以参考另一篇 TypeScript - Setup with Node.js # Grunt
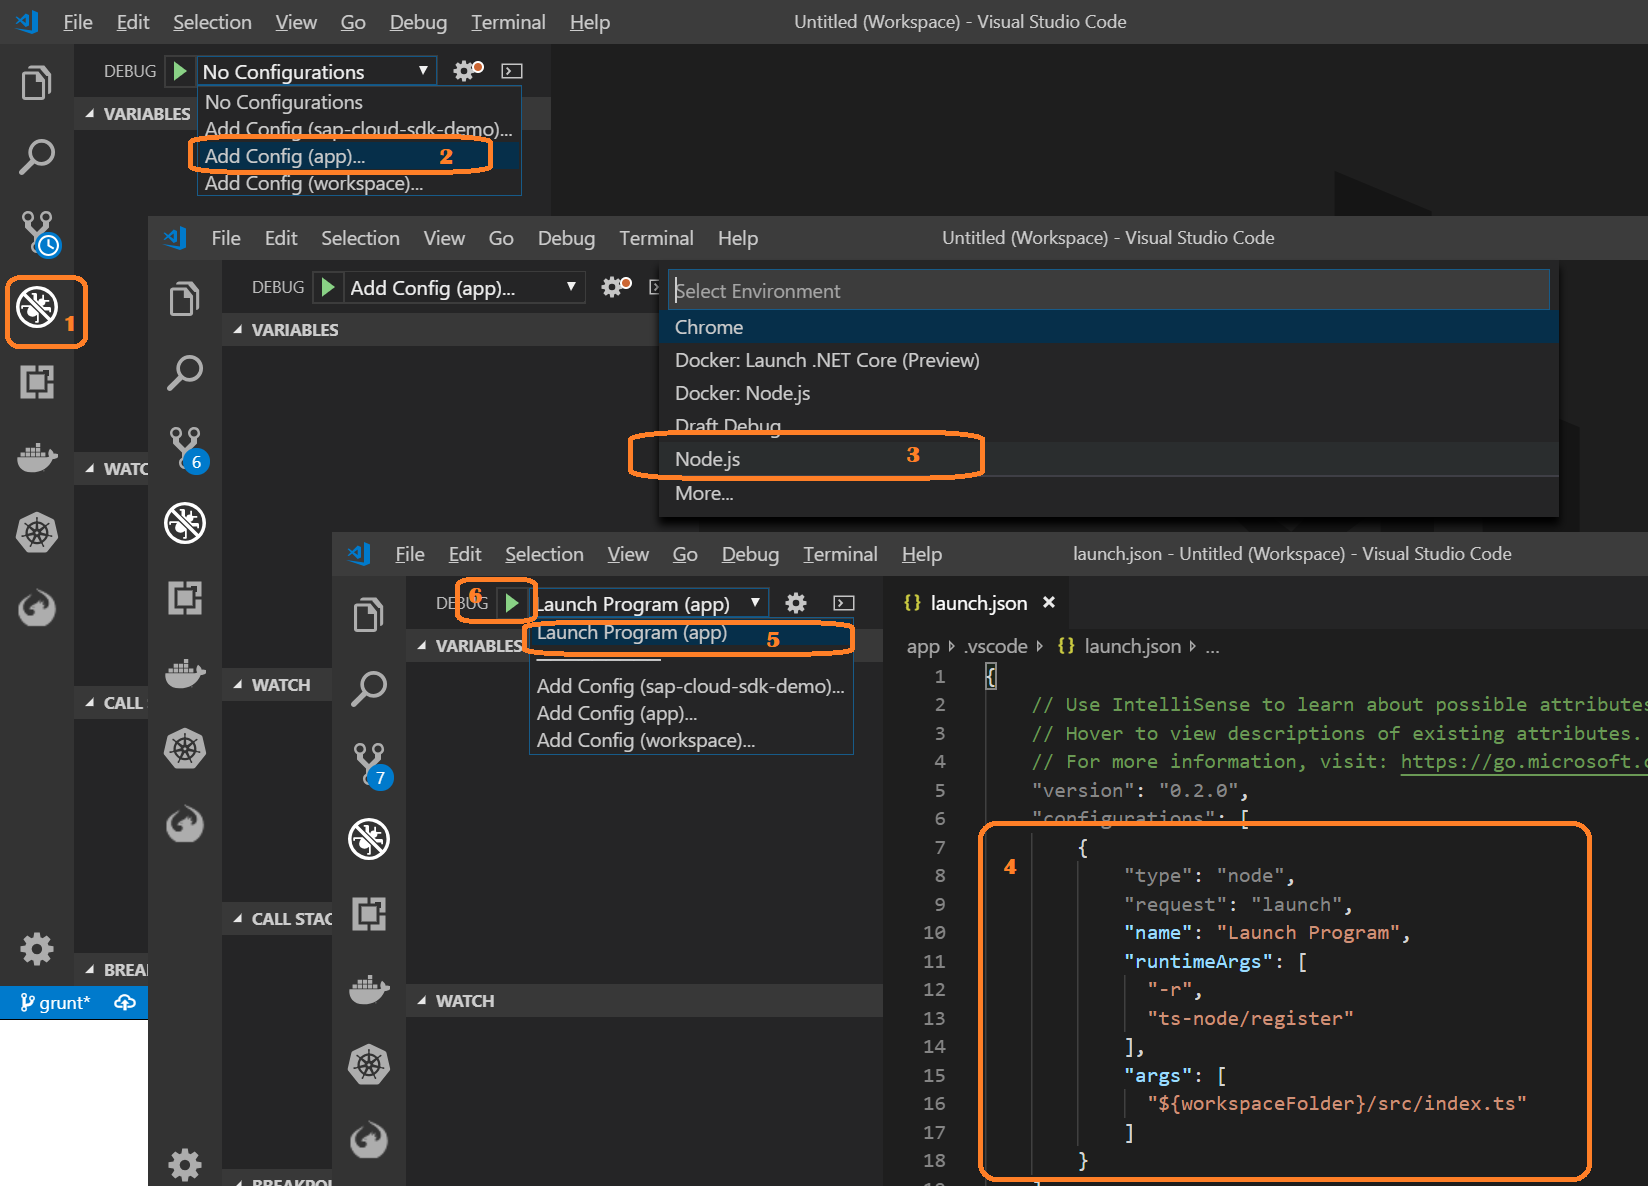
Step 6. Debugging
参考另一篇 TypeScript - Setup with Node.js # Debugging,Visual Studio Code Debug 配置如下
{
  "type": "node",
  "request": "launch",
  "name": "Launch Program",
  "runtimeArgs": [
    "-r",
    "ts-node/register"
  ],
  "args": [
    "${workspaceFolder}/src/index.ts"
  ]
}
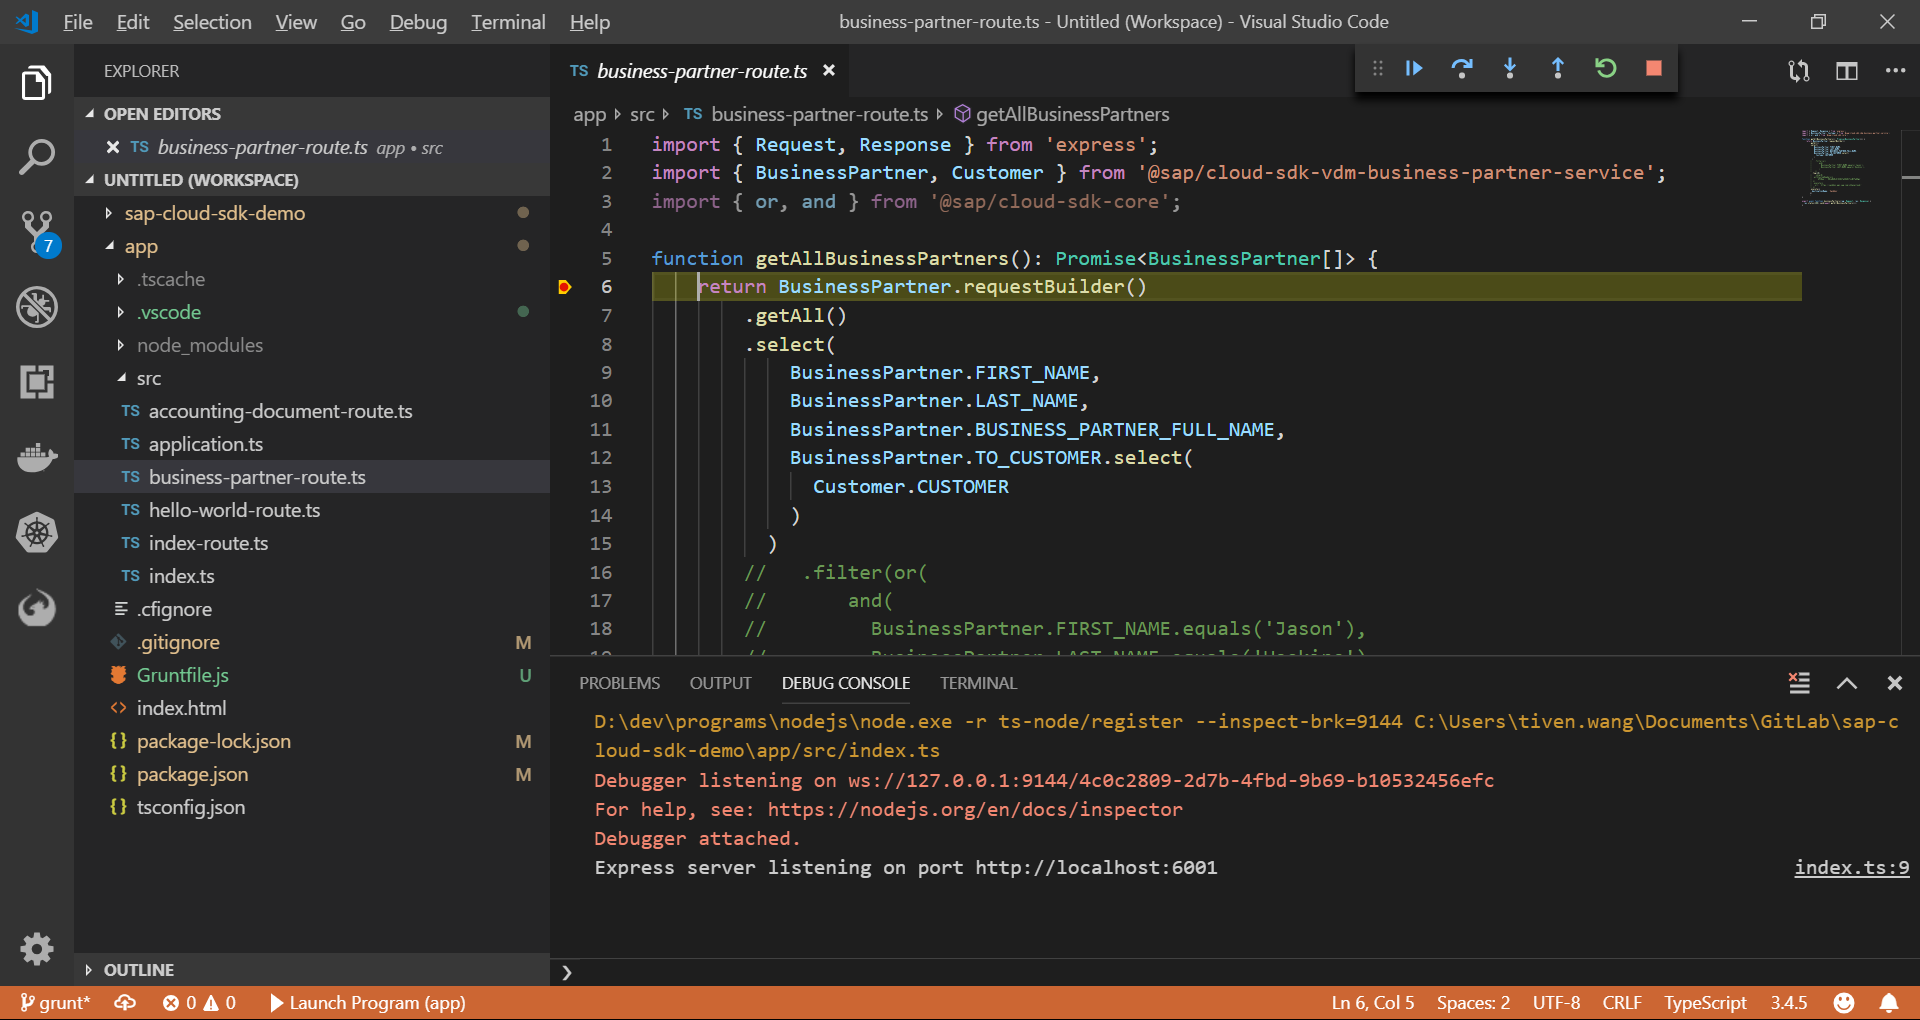
操作步骤如下图
断点打上,访问 url 就可以 debugging 了
Comments