- API Gateway in Microservices
- Architecture
- Step 1. Setup Approuter Application
- Step 2. Protect Backend App
- Step 3. Create UAA Service
- Step 4. Manifest
- Step 5. Test
- Next Steps
接上一篇 Getting Started with SAP Cloud SDK TypeScript version 创建的 CF Application 程序,本篇(项目源代码可下载自 GitLab sourcecode)介绍如何为我们的云程序加上身份认证的功能。
API Gateway in Microservices
关于 Microservices 的 API Gateway 概念请参考 Microservices - API Gateway
Usual concerns “once managed” in this level are:
- SSL Termination
- Logging
- Application Metrics
- Load Balancing
- Authentication & Authorization
- Content Negotiation
- Caching
- Content Compression
- Rates Limit
- …
– from A Node.js API Gateway that you control
其他的一些 API Gateway 框架
Architecture
首先来看一下 App router 和 UAA 组成的微服务架构
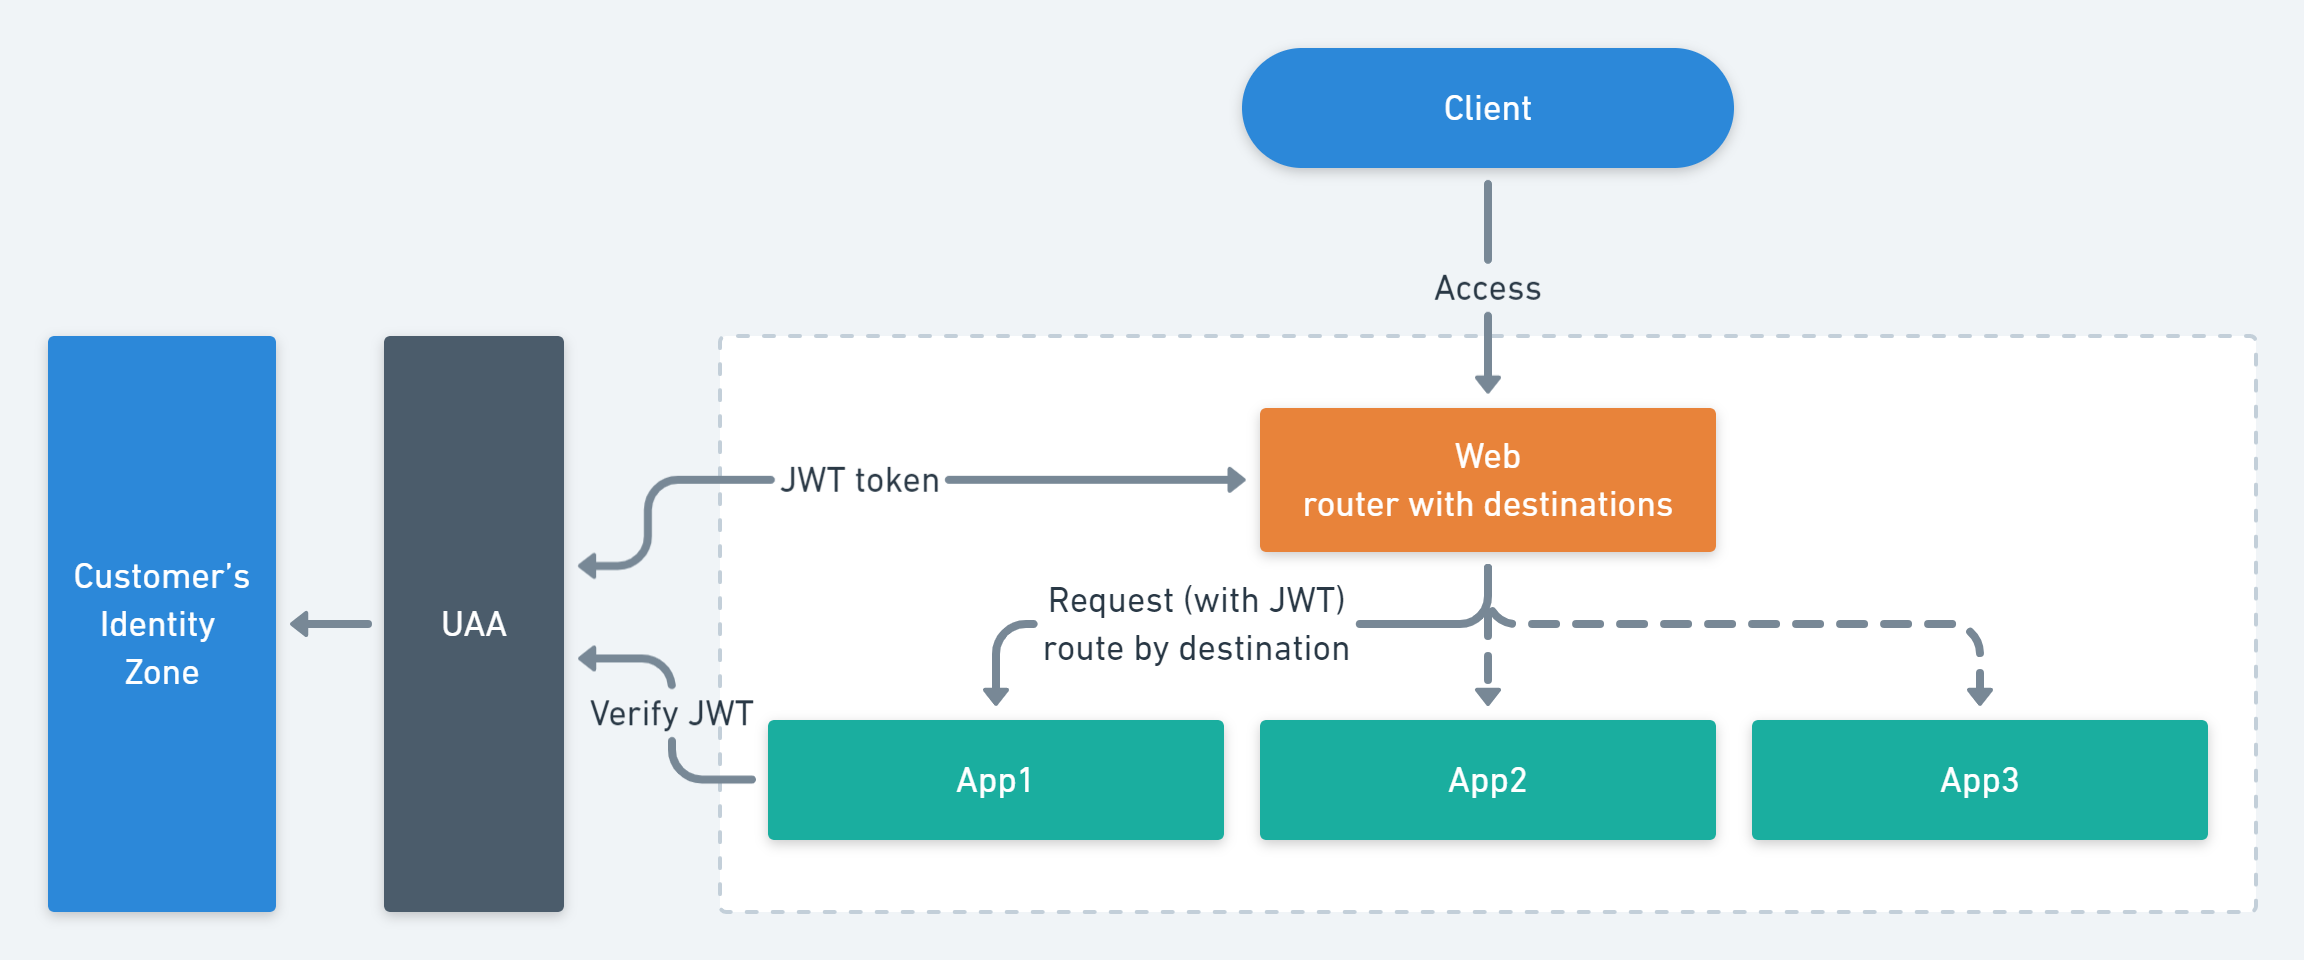
- Approuter dispatches calls to various microservices via HTTP Destinations that are maintained in the environment variable of the Approuter.
-
In Cloud Foundry, authentication works on OAuth protocol by forwarding all the application scopes the current user has been granted with a token called Json Web Token (JWT). This token is generated by the approuter application by talking to the UAA instance (the UAA instance is linked to the customer’s Identity zone and bound to the approuter application). The approuter also forwards the token when the call is dispatched to other microservices or applications.
- Approuter acts as a single end-point to all logically grouped applications/microservices.
Step 1. Setup Approuter Application
在之前创建好的项目根目录下创建目录 web,里面存放所有微服务的前端程序。进入 web 目录初始化为 npm 项目,安装 NPM 组件 npm install @sap/approuter --save。项目目录结构如下
sap-cloud-sdk-demo
|-- app
|   |src
|   |package.json
|   |tsconfig.json
|-- web
|   |package.json
|   |xs-app.json
|manifest.yml
|xs-security.json
创建文件 xs-app.json 并添加内容
{
    "routes": [
      {
        "source": "^/myapp/(.*)$",
        "target": "$1",
        "destination": "myapp"
      }
    ]
  }
source是正则表达式,去匹配用户访问的 urltarget是 redirect 到哪里去,这里的变量$1是source里(.*)$匹配到的字符串destination是用户访问请求会被 redirect 到的地方,这会在 manifest 配置环境变量里,或者在SAP Cloud 平台的 Destinations 里配置的。例如下面,则是转到 ABAP Cloud Connector 连接的 on-premise 系统的 OData 服务{ "routes": [ { "source": "/", "target": "/sap/opu/odata/sap/EPM_REF_APPS_PROD_MAN_SRV/Products", "destination": "abapBackend1" } ] }
最后在 package.json 文件中添加脚本命令
"scripts": {
    "start": "node node_modules/@sap/approuter/approuter.js",
}
Step 2. Protect Backend App
上一步我们配置好了 Approuter 并设置好的路由和 Destination , 接下来就需要对被访问和保护的应用程序 app 加入授权限制了。 安装以下依赖
npm install @sap/xsenv @sap/xssec passport -–save
修改程序以用 JWT Token 保护程序访问身份,这里的 uaa 名称要和后面将要创建的 UAA 服务实例名称一致
const passport = require('passport');
const xsenv = require('@sap/xsenv');
const JWTStrategy = require('@sap/xssec').JWTStrategy;

const services = xsenv.getServices({ uaa:'my-xsuaa' });
passport.use(new JWTStrategy(services.uaa));

this.app.use(passport.initialize());
this.app.use(passport.authenticate('JWT', { session: false }));
Verify the request is authenticated by checking the JWT token in the request by using JWTStrategy provided by the @sap/xssec package.
Step 3. Create UAA Service
因为上一篇我们已经创建了一个 xsuaa 服务,所以用户可以跳过,此步骤只针对没有创建 uaa 服务的。
在项目根目录创建文件 xs-security.json 并添加内容
{
  "xsappname" : "myapp",
  "tenant-mode" : "dedicated"
}
If the variable is
"tenant-mode": "shared"that assumes a multi-tenant application and will require theTENANT_HOST_PATTERNvariable to be declared. You may also use"tenant-mode": "dedicated"if you develop a single-tenant application.
执行下面命令以创建 xsuaa 实例(名称要与程序里一致)
cf create-service xsuaa application my-xsuaa -c xs-security.json
Step 4. Manifest
最后配置我们的 CF 配置文件 manifest.yml 如下
applications:
  - name: my-cloud-sdk-demo
...
  - name: web
    path: web
    buildpacks:
      - nodejs_buildpack
    memory: 128M
    command: npm run start
    random-route: true
    env:
      destinations: >
        [
          {
            "name":"myapp",
            "url":"https://my-cloud-sdk-demo-baboon.cfapps.eu10.hana.ondemand.com/",
            "forwardAuthToken": true
          }
        ]
    services:
      - my-xsuaa
新增的 web 应用配置有以下两点需要说明
- destinations 配置一个名称和程序里 routes 里一致的,url 代表被保护的 App 访问 url
- 把 uaa 服务绑定给此程序
Step 5. Test
重新 push 应用后,访问你的应用地址,如我的是 web-brave-porcupine.cfapps.eu10.hana.ondemand.com , 会被转到 https://ptrial.authentication.eu10.hana.ondemand.com/login , 进行登录,然后就会转到需要访问的页面或 url 。
Locally
因为在本地测试不需要 JWT ,为了便面麻烦在程序里我们使用环境变量判断是否是本地执行来跳过 JWT 检查
const cfenv = require("cfenv");
const appEnv = cfenv.getAppEnv();

if(!appEnv.isLocal) {
  const services = xsenv.getServices({ uaa:'my-xsuaa' });
  ...
}
Comments