- Series
- Prerequisites
- Create Node.js application code
- Create MongoDB service
- Install application
- Next Steps
上一篇Getting Started with HCP Cloud Foundry我们讲了如何在HCP Cloud Foundry上创建Project的基础知识,本篇进一步介绍如何创建Node.js应用,并且连接到HCP CF所提供的MongoDB服务。
Series
- Getting Started with HCP Cloud Foundry
- How to develop a Node.js application with MongoDB service on HCP Cloud Foundry
- How to develop a Node.js applicaiton with RabbitMQ service on HCP Cloud Foundry
Prerequisites
Login
cf api https://api.cf.us10.hana.ondemand.com
cf login
Check services
- 查看可用的services
cf marketplace
output
service      plans            description
mongodb      v3.0-container   MongoDB document-oriented database system
postgresql   v9.4-container   PostgreSQL object-relational database system
rabbitmq     v3.6-container   RabbitMQ messaging
redis        v2.8-container   Redis in-memory data structure store
- 查看可用的buildpacks
cf buildpacks
output
buildpack              position   enabled   locked   filename
staticfile_buildpack   1          true      false    staticfile_buildpack-cached-v1.3.9.zip
java_buildpack         2          true      false    java-buildpack-v3.7.1.zip
ruby_buildpack         3          true      false    ruby_buildpack-cached-v1.6.19.zip
nodejs_buildpack       4          true      false    nodejs_buildpack-cached-v1.5.15.zip
go_buildpack           5          true      false    go_buildpack-cached-v1.7.8.zip
python_buildpack       6          true      false    python_buildpack-cached-v1.5.6.zip
php_buildpack          7          true      false    php_buildpack-cached-v4.3.14.zip
binary_buildpack       8          true      false    binary_buildpack-cached-v1.0.2.zip
Create Node.js application code
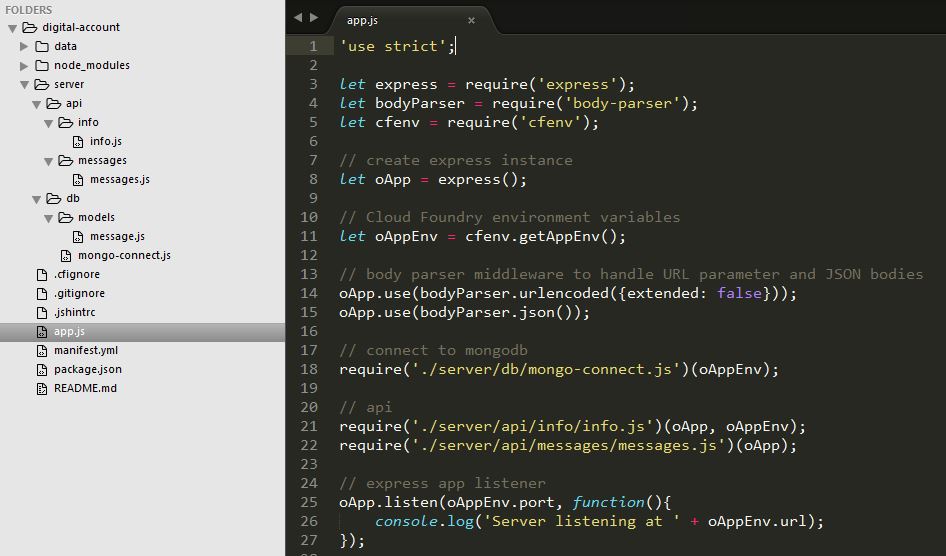
创建Node.js application的具体过程不在此叙述,有需要的请查看Node.js教程。本应用完整代码可以在这里下载Github
Node.js dependencies
添加程序中用到的一些依赖包
- express
- body-parser
- mongoose
- cfenv
- path
可以用此命令安装
npm install --save dev express body-parser mongoose cfenv path
最终package.json一些信息长这样
{
  "name": "hcp-cf-digital-account",
  "version": "0.0.1",
  "dependencies": {
    "body-parser": "^1.15.2",
    "cfenv": "^1.0.3",
    "express": "^4.14.0",
    "mongoose": "^4.5.10",
    "path": "^0.12.7"
  }
}
The application manifest
application manifest file manifest.yml 描述了Node.js应用和Cloud Foundry配置信息,当cf push命令创建应用时会使用到这里的信息去设置一些环境配置。
后面我们会添加MongoDB service配置。
---
applications:
- name: digital-account
  buildpack: nodejs_buildpack
  command: node app.js
  memory: 128M
  disk_quota: 128M
  host: digital-account
每个参数的含义如下
- name: The name of the application.
- buildpack: The name of the Node.js buildpack determined before with command
cf buildpacks. It is also possible to reference the buildpack sources on GitHub. By default an auto determination of the buildpack is done if the buildpack information is missing in the application manifest. But from my point of view it is clearer to specify it in the application manifest. - command: Node.js applications needs a start command to start the application. In the example “node app.js” is called which executes the JS code in a file “app.js” which is described later. The command is executed automatically after the application is successfully deployed to the Cloud Foundry instance.
- memory: Definition of the RAM available for the application. For the demo 128 MB are used.
- disk_quota: Definition of the disk space available for the application. For the demo 128 MB are used.
- host: Host information for the application which is used in the URL which makes the application accessible.
Application structure
.cfignore 文件是说明需要被cf push命令忽略的目录,比如需要将/data和/node_modules加到此文件中。
/data 是在运行local的mongodb server时生成的文件,后面我们会讲到。/node_modules 是存放Node.js依赖包的文件夹,因为Cloud Foundry会为我们解决依赖问题,所以我们不需要将依赖包上传。

Local test
部署到Cloud Foundry时测试是个麻烦事,所以我们要在本地进行测试过。
Run local mongo server
在本机安装MongoDB,并用此命令运行mongo server
\digital-account>mongod --dbpath=./data
Run Node.js express server
\digital-account>node app.js
output
\digital-account>node app.js
Server listening at http://localhost:6001
Test get info
get http://localhost:6001/api/info
output
[
  {
    "object": "VCAP_SERVICES env",
    "value": "local not available"
  },
  {
    "object": "VCAP_APPLICATION env",
    "value": "local not available"
  },
  {
    "object": "Name of Application",
    "value": "digital-account"
  },
  {
    "object": "Port",
    "value": 6001
  },
  {
    "object": "URL",
    "value": "http://localhost:6001"
  }
]
Test post message
使用下面body内容post http://localhost:6001/api/message
{
  "result": [
    {
      "content":{
        "text":"Hello world!"
      },
      "createdTime":1475033537220,
      "eventType":"138311609000106303",
      "id":"WB1519-3872640834"
    }
  ]
}
Test get message
get http://localhost:6001/api/message
[
  {
    "id": "WB1519-3872640834",
    "createdTime": "1475033537220",
    "eventType": "138311609000106303",
    "text": "Hello world!"
  }
]
测试通过后我们将要push到HCP Cloud Foundry服务上去。
Create MongoDB service
在install之前我们需要为application添加MongoDB service。
执行此命令创建一个mongodb服务mongodb-digacc-service
cf create-service mongodb v3.0-container mongodb-digacc-service
检查service实例创建成功
\>cf services
Getting services in org XXXX / space XXX as XXXX@XXX.com...
OK

name                     service   plan             bound apps   last operation
mongodb-digacc-service   mongodb   v3.0-container                create succeeded
然后application manifest文件中需要加上此mongodb服务
---
applications:
- name: digital-account
  buildpack: nodejs_buildpack
  command: node app.js
  memory: 128M
  disk_quota: 128M
  host: digital-account
  services:
  - mongodb-digacc-service
Install application
cf push
成功后就可以使用了。
Next Steps
本文介绍了在HCP Cloud Foundry上创建Node.js应用程序,并使用MongoDB service数据库服务保存查询消息的功能。使用到了一些Cloud Foundry的基础命令。 接下来我们在此基础上再增加RabbitMQ服务来增强应用的负载能力
Comments